
Heating circuits can be found in airplanes, electronic message boards, medical storage devices, and much more. Like many other heating elements, these circuits work through resistive heating, a multiphysics process involving electric currents, heat transfer, and structural deformation. To account for these phenomena and other key design factors, engineers can create virtual prototypes of heating circuits using the COMSOL Multiphysics® software.
Warming Up Products with Heating Circuits
Heating circuits can provide localized heating to a product or fluid, a helpful trait for a wide range of industry use cases. Often used with temperature sensors, these circuits help in the following areas:
- Preventing lenses and windshields (such as for cars and aircraft) from icing over and fogging up
- Protecting outdoor electronic devices (such as message boards) from humidity and extreme temperature changes
- Keeping medical products and samples at a steady temperature during testing and storage
- Warming adhesives and fluids in manufacturing processes

Electronic message board for a highway. Image by Oregon Department of Transportation. Licensed under CC BY 2.0, via Flickr Creative Commons.
These heating elements work through resistive heating, also called Joule heating, which involves multiple physical phenomena:
- When a voltage is applied, electric currents begin to flow through the circuit
- These currents generate heat due to the electrical resistivity of the circuit’s material
- The increasing temperature causes the device to deform
While deformation can sometimes be useful (e.g., in thermal actuators), it can alternatively be a design concern for heating circuits. These circuits are often bonded to another nonconductive material, and too much bending can overstress the adhesive and cause the resistive layer to detach — which in turn could cause the layer to catch on fire. Designers must also make sure that the part doesn’t overheat the fluid or product it’s used with. This can be a challenge due to the multiple physical phenomena involved in resistive heating as well as the variety of factors (such as the applied voltage, geometry, materials used, environmental conditions, etc.) that affect a heating circuit’s effectiveness.
By using the COMSOL® software, engineers can evaluate and improve the performance of heating circuits, taking all of the various phenomena and design factors into account. In the next section, we will take a look at one example: a multiphysics model of a small heating circuit. Note that to create this model, the add-on Heat Transfer Module, Structural Mechanics Module, and either the AC/DC Module or MEMS Module are required.
Modeling the Multiphysics of Heating Circuits
This model includes two parts: a resistive layer and a glass plate. The resistive layer is made of nichrome, a common material for resistive heating elements, and measures 10 μm thick and 5 mm wide. As shown in the image below, it is serpentine-shaped, with the ends capped by silver contact pads. As for the glass plate, the upper side (where the resistive layer is attached) is surrounded by air, while the lower side faces a reactive fluid.
After setting up the geometry, the next step is to model the generation and transfer of heat for an applied voltage (12 V in this case). To determine the heat source that results from the flow of current in the resistive layer, you can use the Electric Currents in Layered Shells interface. This interface solves for current conservation and is especially suited for layers that are geometrically very thin yet electrically very significant. In this case, the geometrical thickness of the layer is small enough for it to be excluded from the geometry and mesh altogether, drastically simplifying geometry and mesh handling. At the same time, a zero thickness is not an appropriate approximation from a physical viewpoint. This is because of the large contrast in material properties between the layer and its surroundings. The Electric Currents in Layered Shells interface uses the appropriate thickness when solving the equations, even though it is not explicitly included in the geometry.
For the heat transport problem, a similar approach is used. The model takes advantage of the Thin Layer feature in the Heat Transfer in Solids interface and the Electromagnetic Heating multiphysics coupling, which automatically combines the physics for simulating Joule heating. This example then couples the thermal problem in the layer to the plate and uses heat transfer coefficients to simulate how the heat is transferred from the plate to the fluid, as well as how the heat dissipates to the surrounding air through natural convection.
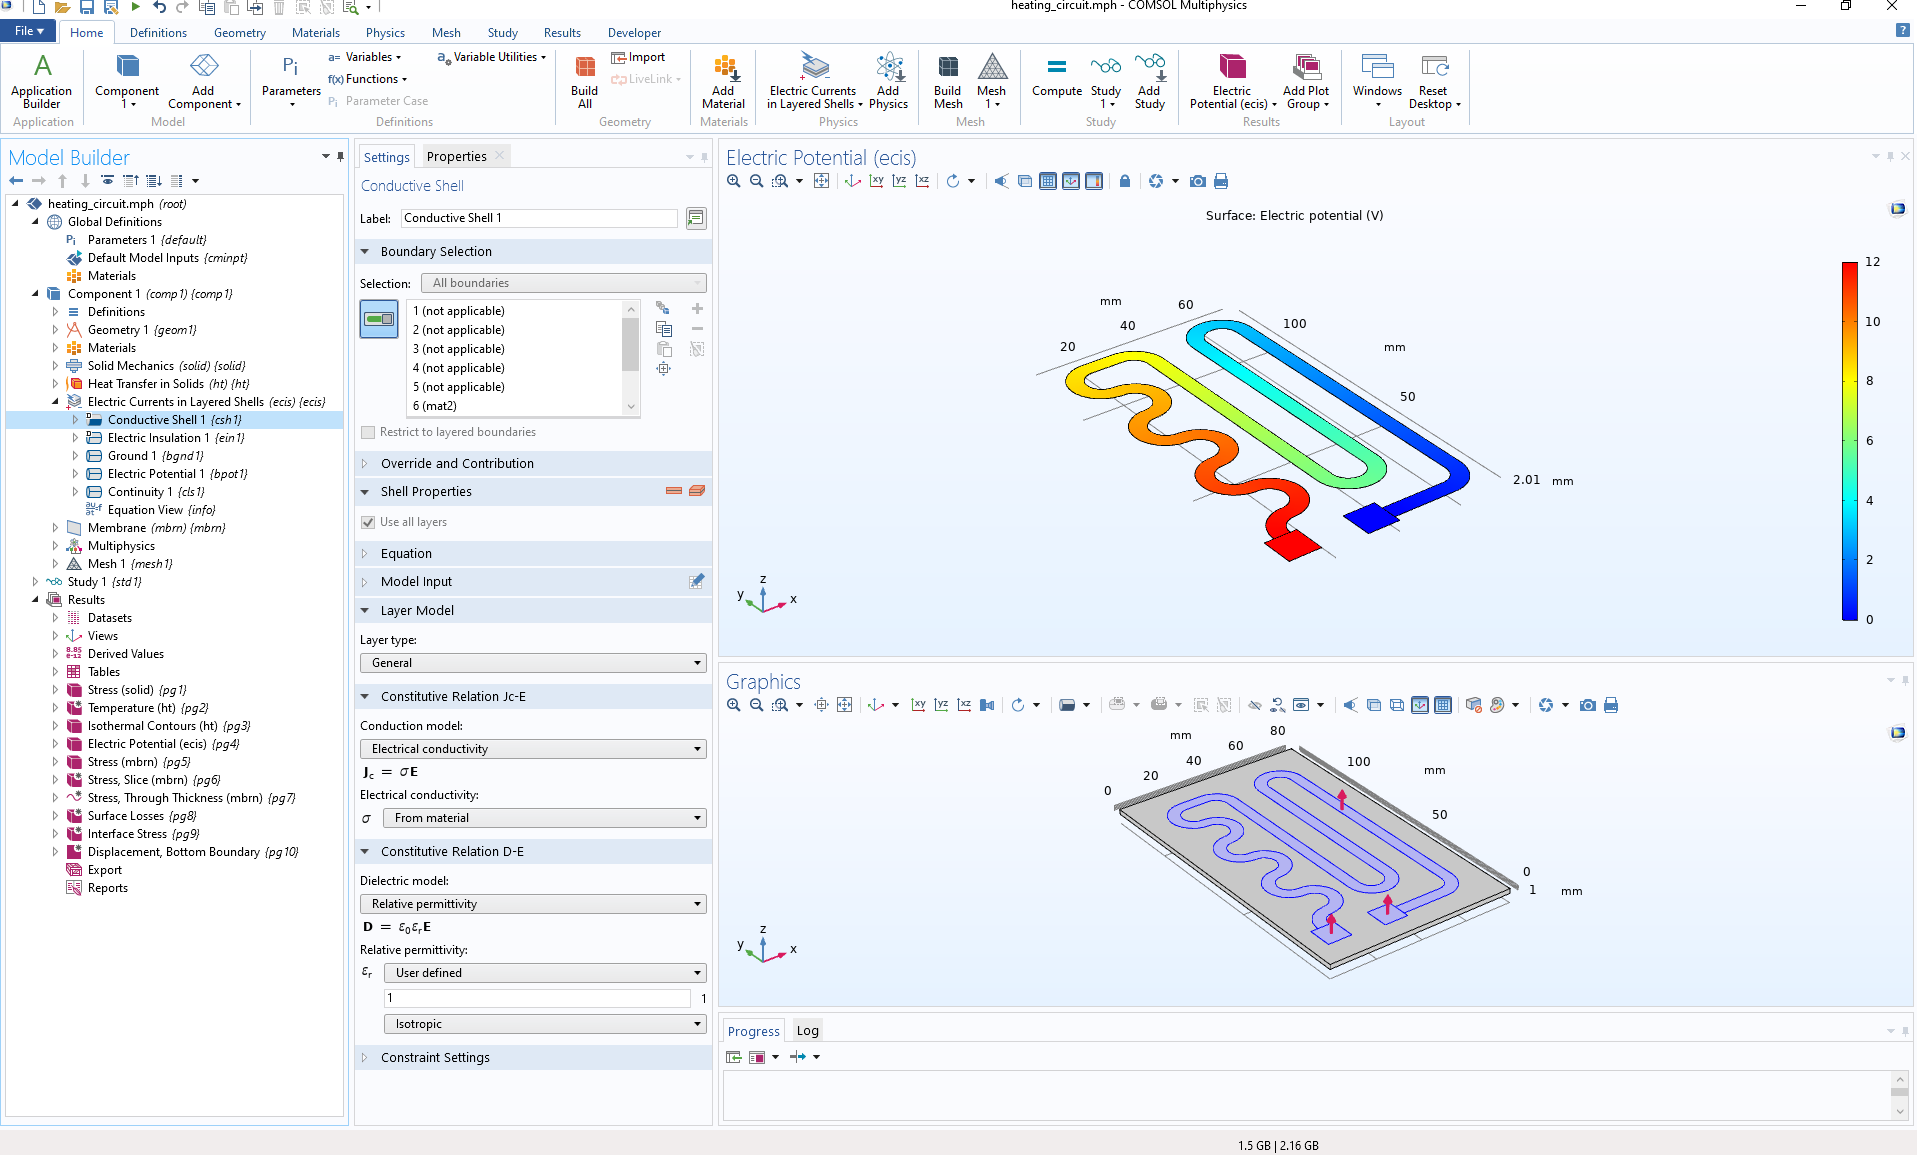
Screenshot showing the modeling of the electrically generated heat in the resistive layer.
To easily simulate the resulting deformation (and possible delamination), you can perform two stationary structural mechanics analyses. Here, the Solid Mechanics interface is a good choice for the glass plate, while the Membrane interface (which is especially suited for thin structures) is used for the resistive layer.
Examining the Simulation Results for the Heating Element
Heat Generation and Transfer
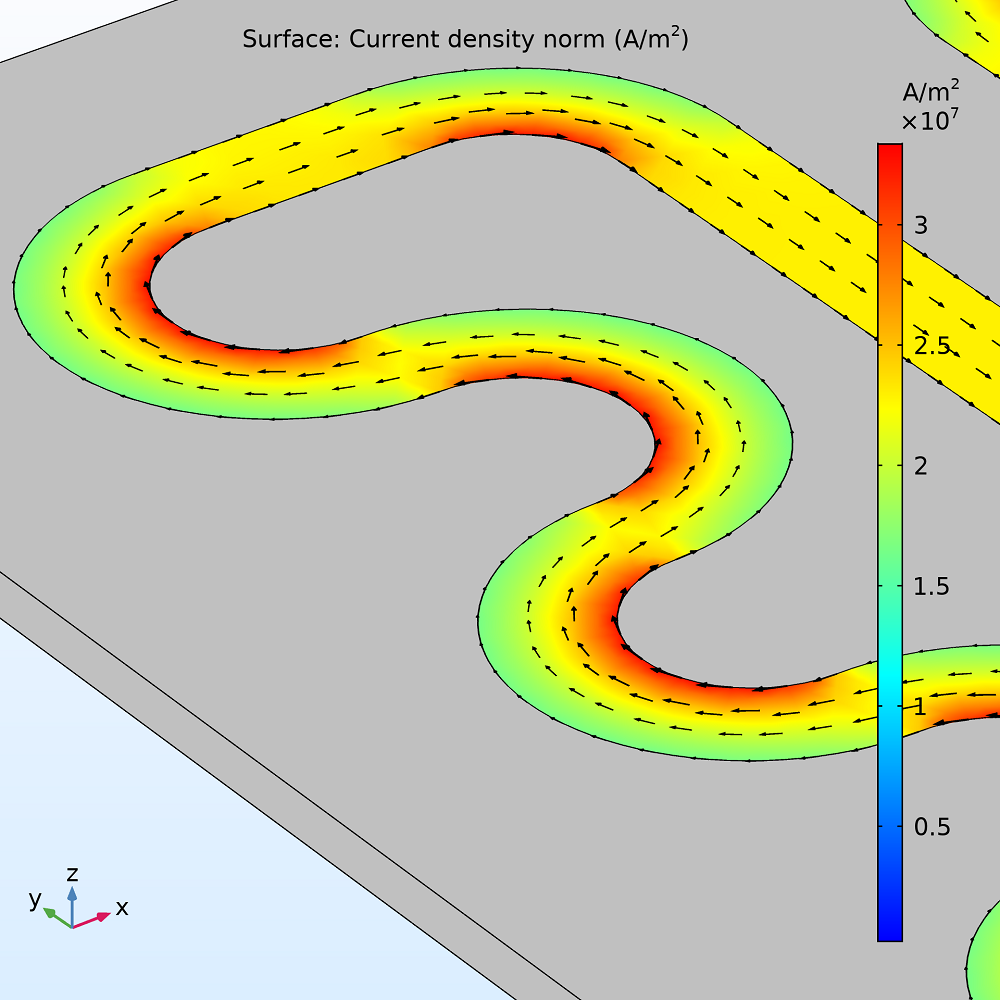
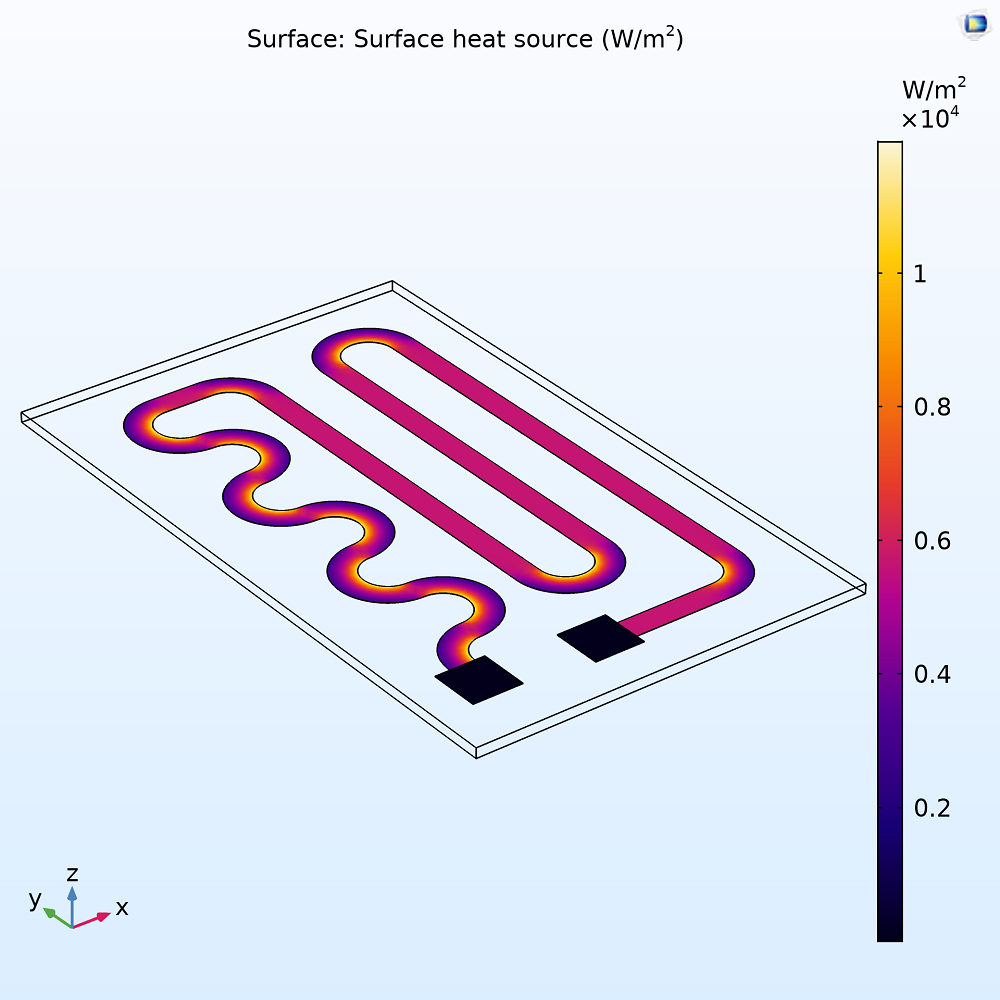
Solving the model enables you to visualize the heat generated in the resistive layer. Here, the strongest heat source occurs where the current density is highest: the inner bends of the curves. This concentration of current is due to the potential gradient being inversely proportional to the distance between the ground connection and the terminal. Since the inner bends represent the shortest path, they naturally develop the strongest currents. By integrating over the surface area of the resistive layer, you can obtain the total heat generated due to electrical resistivity, ~13.8 W.
Current density (left) and heat generated (right) in the resistive layer.
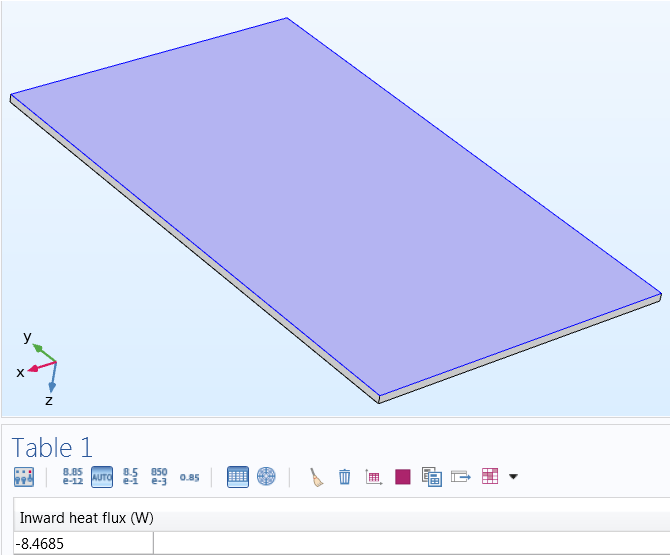
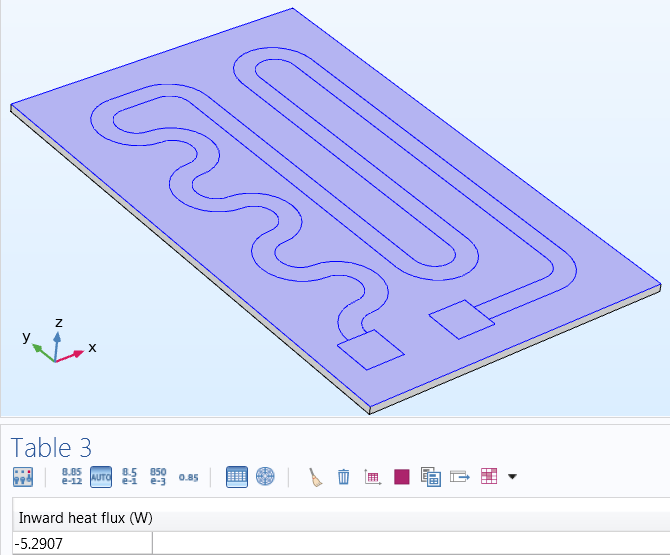
To determine the efficiency of the device, you can start by evaluating the electric input power as well as the heat generation and dissipation. Here, the input power (given by V*I, which in this case is 12 volts and 1.15 amps) equals the same as the total generated heat: 13.8 W. As shown below, the highest temperature occurs toward the center of the circuit: 154.1°C. By integrating over the area of the bottom surface of the plate, you can obtain the amount of heat that is transferred to the fluid, 8.5 W. Similarly, you can calculate the amount of heat dissipated into the surrounding air: 5.3 W. Doing so not only shows the design is relatively efficient at heating the fluid — with 62% of the generated heat being transferred — but also shows that since the energy output is equal to the input, energy is conserved.
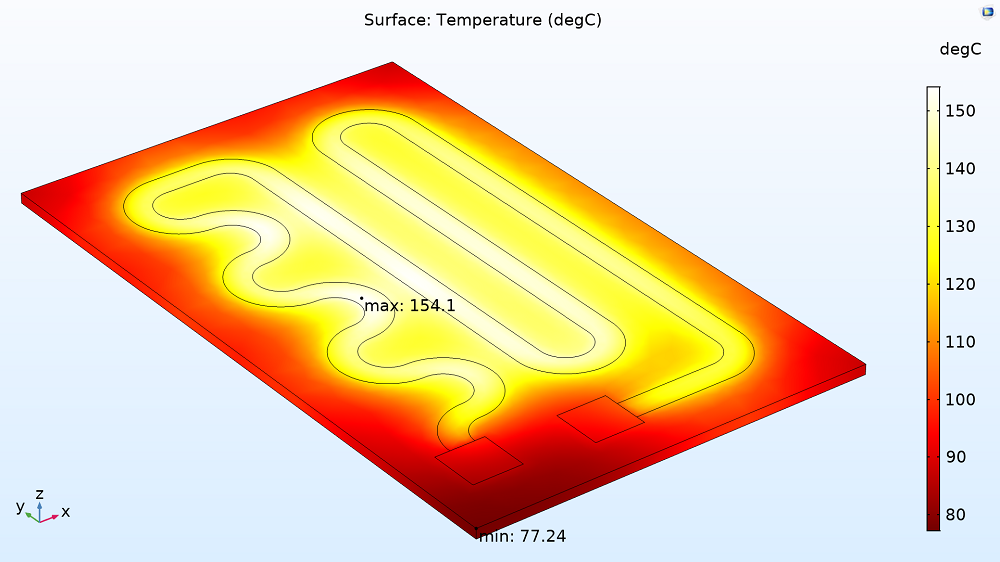
Temperature distribution in the layer and plate, displaying where the maximum (154.1ºC or 309.5ºF) and minimum (77.2ºC or 171ºF) temperatures are exhibited.
The heat dissipated through the bottom (~8.5 W) and top (~5.3 W) sides of the heating circuit.
Stress, Deformation, and Delamination
By looking at the equivalent stress, you can determine if a heating circuit design will break. In this model, the layer and plate deform by ~50 μm, bending toward the air. The bending places stress on the design, particularly at the inner corners of the circuit, where the equivalent stress reaches its highest point at ~13 MPa. Still, this is well under the max yield stress for the glass and nichrome (250 and 360 MPa, respectively), meaning they both stay intact.
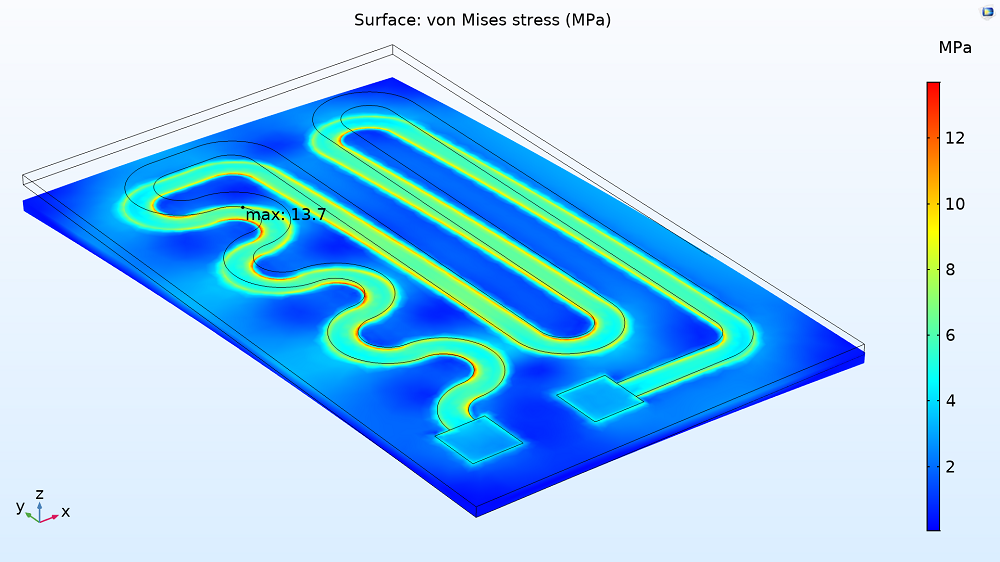
The von Mises stress in the heating circuit.
Now the only question is whether or not the two will stay bonded together. To determine if there’s any delamination, you can examine the interfacial stress between the nichrome layer and the glass plate. For this case, the stress is much smaller than the surface adhesion yield stress (50 MPa), indicating that the two elements will have no problems staying together.
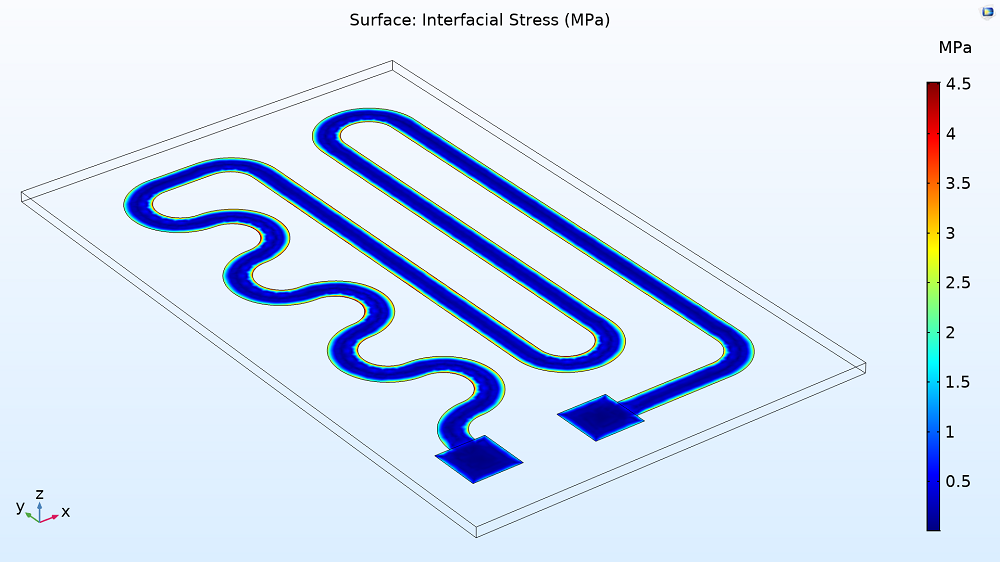
The interfacial stress in the heating circuit.
As shown from this example, engineers can use the COMSOL® software to analyze heating circuits, accounting for the multiple physical phenomena involved. They can then use the results to improve the design for a certain use case. For example, when designing a heating circuit for a high-precision application (like semiconductor packaging), an engineer could reduce the amount of deformation.
Next Steps
You can see all of the steps for modeling a heating circuits by clicking the button below. This will take you to the Application Gallery, which contains documentation for this example as well as the related MPH file.
Editor’s note on August 1, 2023: The tutorial model featured throughout this blog post was updated in the release of COMSOL Multiphysics® version 6.1. Some of the abovementioned features and functionality have changed in the latest version of the tutorial.



Comments (1)
Houman Ghorbani
January 6, 2021Hi Bridget
Many thanks for this useful and comprehensive paper.
I wonder where I can find the numerical values for maximum surface adhesion yield stress (which is 50 MPa in your example).
Thanks a lot, in advance
Best wishes
Houman