
When modeling acoustic problems that involve waveguide structures (like channels, ducts, and muffler systems), the Port boundary condition is essential. Ports can handle the propagating modes in waveguides in an efficient and consistent manner, both when modeling nonreflecting conditions at outlets and when applying sources at the inlet of a system. Let’s look more at the Port boundary condition, such as its features and postprocessing strategies, through an example of a duct with a bend.
About the Port Boundary Condition
The Port boundary condition, introduced in version 5.4 of the COMSOL Multiphysics® software, is applicable for models that are set up using the Pressure Acoustics, Frequency Domain interface. The boundary condition is used to prescribe a nonreflecting condition at the end of a waveguide (an outlet) as well as to set up an incident wave at a boundary (a source). Combining several Port conditions enables us to easily compute transmission and insertion loss in, for example, exhaust and muffler systems. The condition also automatically evaluates the scattering properties of a multiport system in terms of its scattering matrix.
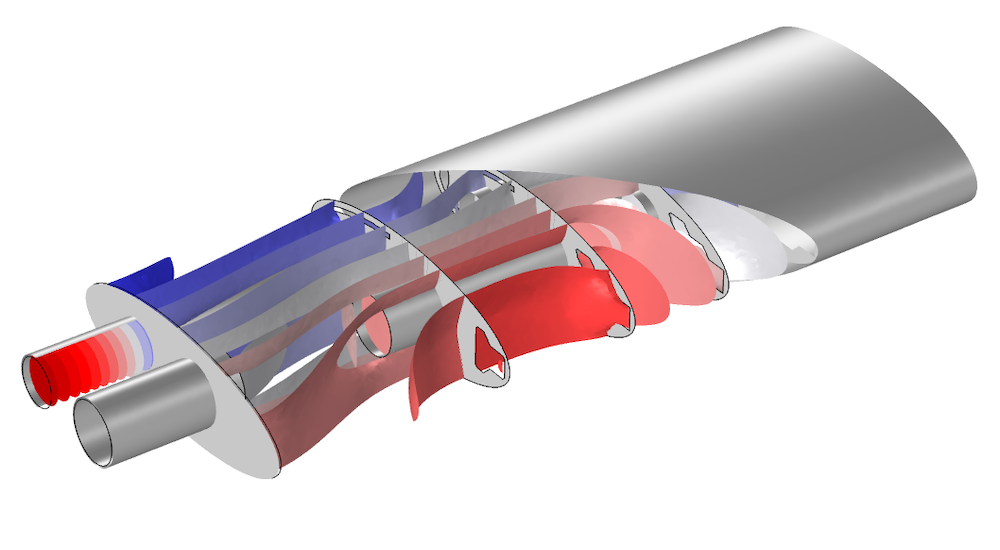
The Port condition is well suited for modeling the inlet and outlet of a muffler. Here, the isosurface plot of the pressure at 590 Hz in the Muffler with Perforates tutorial model is shown.
One Port condition will capture a specific propagating mode; e.g., a plane propagating wave. In order to give the full physical description of an acoustic field, several Port conditions should be added at the same boundary. Each port is assigned to a specific propagating mode. This represents a so-called multimode expansion of the acoustic field and is mathematically based on the orthogonality of the various propagating modes.
Not all modes propagate at all frequencies, so a Port condition will become active as soon as the studied frequency is above the mode cutoff frequency. The cutoff frequency of a mode represents the frequency above which a mode starts propagating. As an example, let us take a look at the Duct with Right-Angled Bend tutorial model. A sketch of the system is shown below. The duct has a rectangular cross section with side lengths of 20 cm × 30 cm.
The image also shows the first four propagating mode shapes: p_1, p_2, p_3, and p_4. The plane mode ( p_1), also called constant pressure or (0,0) mode, propagates for all frequencies (cutoff frequency of 0 Hz), while the subsequent cutoff frequencies of the other modes are 572 Hz, 858 Hz, and 1031 Hz. This means that an analysis of the system up to, say, 1100 Hz requires 4 Port boundary conditions to be added at both the inlet and the outlet boundaries (one port to capture each mode). Above that, the next propagating mode (mode (2,0) not depicted) has a cut-off frequency at 1144 Hz. In this example, the system is excited by an incident plane wave.
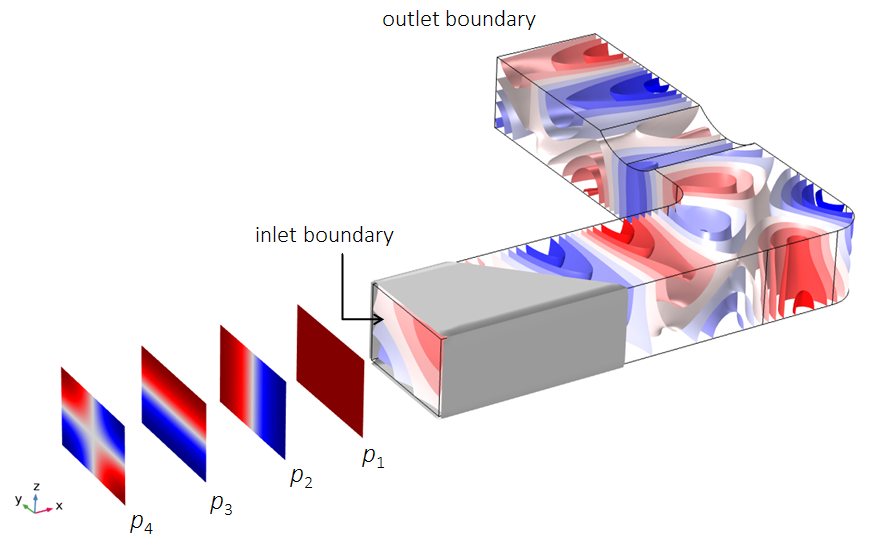
Sketch of the four modes necessary to capture the acoustics in the Duct with Right-Angled Bend model. The isosurfaces show the acoustic pressure field at 750 Hz.
The magnitudes and phases of the various outgoing modes are given by the components of the scattering matrix, or S-matrix. Mathematically speaking, the total acoustic pressure, p_t, at a given boundary (for example, the inlet) is given by the following expression:
where S_{ij} is the components of the scattering matrix, p_i is the port mode shapes, A^\textrm{in} is the amplitude, \phi is the phase of the incident wave (source), the sum is over all of the ports added to the given boundary, and the excitation is at port j.
For the above duct example, i = 1,2,..,8 and j = 1. The mode shapes are normalized such that \max (|p_i|) = 1. The above definition also means that the components of the scattering matrix represent the pressure or amplitude scattering. Hence, the scattering matrix components represent reflection or transmission coefficients. Note that in other physics areas, like RF, it is also common to define the scattering matrix in terms of transmitted or reflected power and not in terms of amplitude.
When several Port conditions are added, the components of the scattering matrix are automatically computed as long as only one of the ports in the system is excited. Several ports can be used as sources simultaneously, but in this situation, the scattering matrix components are not computed. To fill the scattering matrix, the source has to be moved through all of the ports (j swept over all ports). This is achieved using the Port Sweep functionality.
The Port boundary condition has several built-in options to define the port modes. There are two analytical port types: one for waveguides with a circular cross section and one for waveguides with a rectangular cross section. These options are applicable as long as the surrounding walls are sound hard. They are also applicable for fluid models with losses, including attenuation and the Narrow Region Acoustics feature. In addition, there is a Numeric port option that can be applied to an arbitrary cross section; this option requires the addition of a Boundary Mode study step to solve for the mode shapes. Finally, there is a User defined option where the port mode shape, p_n, and the propagation wave number, k_n, have to be entered. This can, for example, be an analytical expression for a given cross section or the result of a separate analysis using the Pressure Acoustics, Boundary Mode interface.
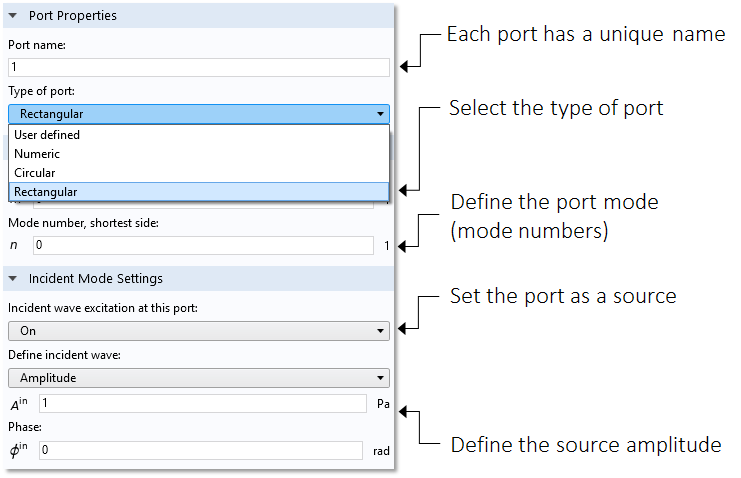
Settings window for the Port boundary condition.
How Many Ports Do I Need?
There are several ways to figure out how many ports are necessary for an analysis up to a certain frequency. In general, the Pressure Acoustics, Boundary Mode interface can be used to compute and analyze all propagating and nonpropagating modes of a waveguide. This makes it possible to compute a dispersion diagram for the given port. See, for example, the blog post on using dispersion curves to analyze fluid-filled pipes or the Eigenmodes in a Muffler with Elastic Walls tutorial.
For the analytical port options, a postprocessing variable exists for the cutoff frequency. For the first port (port1) of the acoustics interface (acpr), the variable is called acpr.port1.fc; for the second port, acpr.port2.fc; and so forth. Simply add several ports, run the model (or select Get Initial Value on the study) for a single arbitrary frequency, and then evaluate the cutoff frequency variables to see which ports to include.
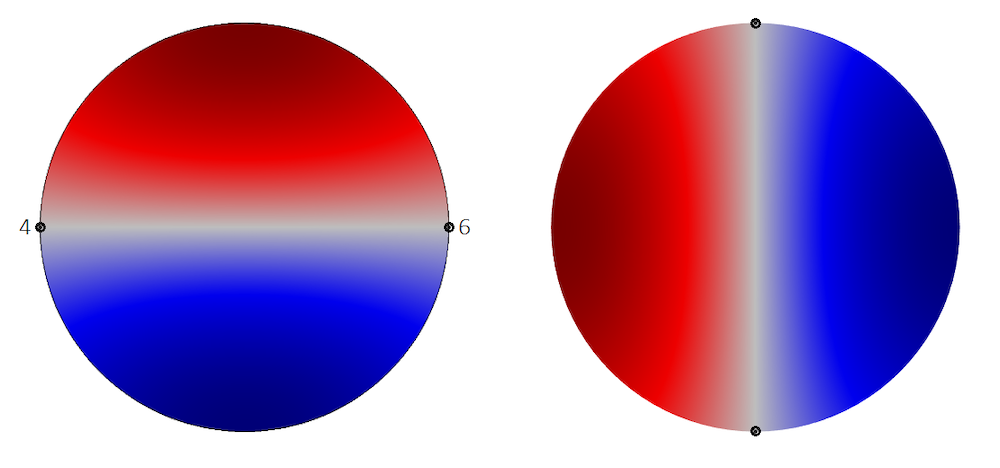
Another important situation to consider is that of degenerate modes. This is when two modes that otherwise would have been separate coincide because of a symmetry in the geometry. The modes in the image below are an example of this situation (using the circular port type option). Had the circle been ever so slightly oval, there would have been two distinct modes. For a perfect circle however, one mode is just the other rotated by 90 degrees, so they share the same eigenvalue. Importantly, this does not alter the fact that they both need to be included in the model by adding two Port conditions. To orient the circular modes, it is necessary to add the Circular Port Reference Axis subnode to the Port condition. In each Port, select two points to define the reference 0° orientation of the azimuthal angle. These points are highlighted for each mode orientation in the image below.
Note that selecting the correct reference points is also important in case a symmetry line passes through the port, as the modes included in the model need to respect the symmetry condition.
Define the orientation of the circular mode shapes by selecting the proper points to define the reference azimuthal axis.
Postprocessing Strategies for the Port Boundary Condition
Using the Port boundary condition simplifies the postprocessing of important acoustic results. Several predefined variables exist to help the user. They can be seen in the Replace Expression menu, as depicted in the screenshot below. Browse the list under Model > Component 1 > Pressure Acoustics, Frequency Domain > Ports. Remember that the same list can be accessed in an Expression field by using the shortcut Ctrl+Shift. The list is organized such that the variables are listed under each port; moreover, there is a list that contains the computed scattering coefficients.
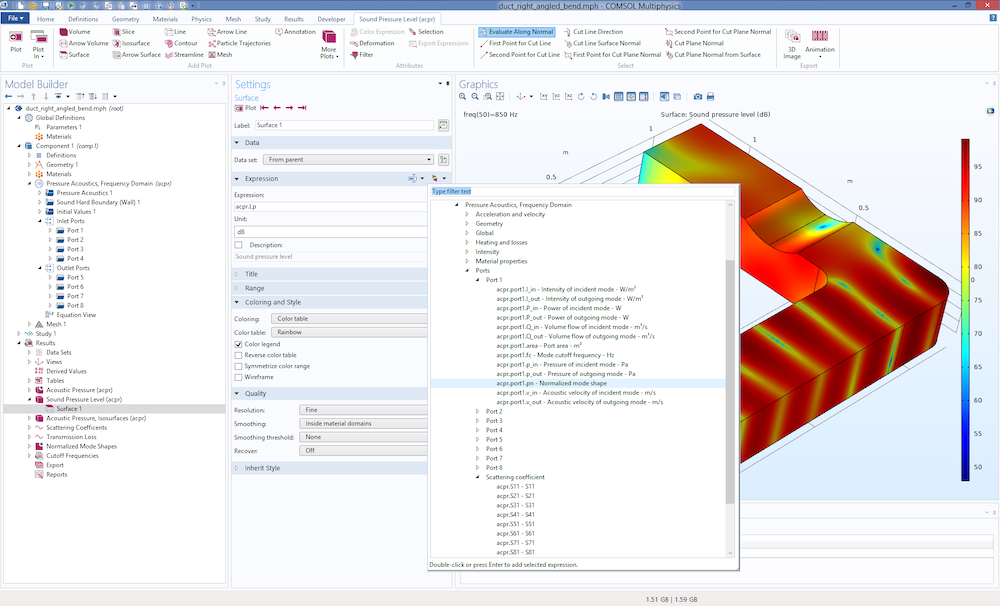
Screenshot from the Duct with Right-Angled Bend tutorial model that depicts the list of postprocessing variables available for the port features.
The list of variables contains the abovementioned cutoff frequency acpr.port1.fc (available for the analytical ports) and a variable for the normalized mode shape acpr.port1.pn. Variables like the particle velocity, intensity, and power have a subscript for the incident component, _in, and the outgoing component, _out. Several of these variables are normally very challenging to compute in a consistent manner as soon as nonplane modes start to propagate. For instance, the simple expression p^2/(\rho c) for the intensity can only be used for the plane propagation component. With the ports, the intensities for higher-order modes are also readily computed. Having the power variables at hand simplifies the computation of, for example, the transmission loss in a model when combined with the Octave Band plot.
Let us get back to the Duct with Right-Angled Bend tutorial. The transmission loss is defined as the ratio of the incident power to the total outgoing power at the outlet. This can be entered directly in the Octave Band plot with the Expression type set to Transfer function as and the expression:
acpr.port1.P_in/(acpr.port5.P_out+acpr.port6.P_out+acpr.port7.P_out+acpr.port8.P_out).
The Octave Band plot allows for easy formatting of the plot using octave averaging, continuous frequency, and weighting. (See the tutorial model for details.)
A final useful postprocessing tool is the Global Matrix Evaluation feature found under the Derived Values node. With this feature, it is possible to display the full scattering matrix as a function of frequency in a results table. The full matrix is, as mentioned, computed if the Port Sweep functionality is used.
Next Steps
Try the tutorial model featured in this blog post by clicking the button below and heading to the Application Gallery. There, you can check out the documentation for this example and download the MPH file.
Note that you can also get a description of the Port feature in the chapter about pressure acoustics in the Acoustics Module Users’s Guide.
Further Resources
- Check out other acoustics examples that use the Port boundary condition:




Comments (4)
Acoustics Analysis
May 1, 2019It would be nice to see this capability extended to the cases of soft-wall ducts, lined with acoustic liners, where all duct modes are coupled and non-orthogonal.
Acoustics Analysis
May 1, 2019Also, sometime frequencies right near cutoff are of interest because they tend to radiate more from the duct open end to the far-filed. A mode at cutoff frequency will still propagate through the duct, but will be decaying exponentially fast. However, if the noise source is near the duct exit and the mode frequency is just below the cut-off, it will still very much be radiation from the duct to the far field because it takes a noticeable distance within the duct for such a mode to decay. In addition, the duct may have variable cross-sectional area, so even if the mode is cut-off at the noise source plane, it will be cut-on in the rest of the duct and still can propagate through the duct if the cut-off section is short.
Mads Herring Jensen
May 1, 2019 COMSOL EmployeeHi “Acoustics Analysis”, this is actually already possible using the user defined option for the port mode definition. The mode can be computed using the Pressure Acoustics, Boundary Mode interface. Here walks can e.g. be defined though an impedance condition. The analysis also works for multiphysics applications like acoustic structure interaction (we have examples of that in our homepage). Best regards, Mads
Acoustics Analysis
May 1, 2019hi Mads Herring Jensen, this is great. It is very useful to have a convenient way to provide nonreflective duct inlet/exit BC for an arbitrary duct mode. thank you!