
We have already discussed the factors that make a high-quality mesh and how to prepare a CFD model geometry for meshing. In this follow-up blog post, learn about physics-controlled meshing, adaptive mesh refinement, and how to use a variety of meshing tools in the COMSOL Multiphysics® software for your fluid flow simulations.
Physics-Controlled Meshing Sequences
After setting up the flow conditions for a fluid flow model, COMSOL Multiphysics enables us to invoke physics-controlled meshing sequences. Such a sequence depends on the following aspects:
- Physics property settings
- A turbulence model with automatic wall treatment, for example, gives finer mesh than a laminar flow model
- Certain features
- Walls, for example, can induce finer meshes and boundary layer meshes
- Geometry bounding box size
- This controls the size scale of the elements
The physics-controlled meshing sequence for the Ahmed body model, which we also used in the previous blog post, looks like this:

Under the Mesh 1 node, the:
- Size subnode contains a set of mesh size parameters that depend on the property settings and the bounding box of the geometry
- Size 1 subnode is active on all no-slip walls and prescribes a somewhat finer mesh there
- Corner Refinement 1 subnode automatically identifies all sharp-enough angles internal to no-slip walls and prescribes an even finer mesh along such edges (in this case, it finds most of the sharp edges on the car, except for the one connecting the roof and the slant)
- Free Tetrahedral 1 subnode creates the actual mesh on both boundaries and in domains
- Boundary Layers 1 subnode adds boundary layer mesh to all no-slip boundaries
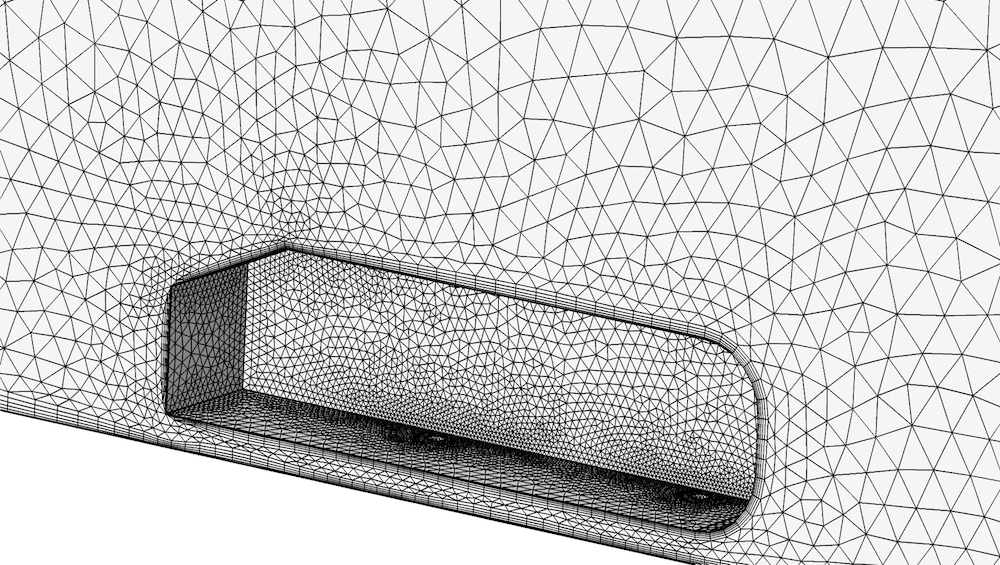
A zoomed-in view of the mesh resulting from the physics-induced meshing sequence for the Ahmed body model. We can see that the mesh is finer on the walls than in the volume, and even finer close to sharp edges. The boundary layer mesh on the no-slip walls is also visible.
The physics-induced mesh can sometimes be sufficient for simple models and is always a good starting point for more advanced meshing. It is perfectly possible to solve the Ahmed body problem with the mesh shown above. However, we can see that the mesh-controlled domain behind the car hasn’t resulted in any finer mesh and the unstructured mesh covers the whole wind tunnel. So, the mesh could be finer behind the car and it is unnecessarily fine far downstream of the car. Using the mesh-controlled domain behind the car and the partition face shown in the first part of this blog series, the total number of elements can be approximately kept constant, but with much better resolution in the wake.
Meshing Tools for CFD Modeling in COMSOL Multiphysics®
COMSOL Multiphysics provides a wide selection of tools to control and generate mesh. We can start by discussing options for surface meshing, since we recommend to mesh faces first to verify adequate resolution and a high element quality. Note that a tool that meshes entities of a certain dimension also meshes adjacent entities of lower dimensions. A Free Triangular feature, for example, meshes both its designated faces as well as all adjacent edges and points that were not meshed previously. Therefore, we don’t need to mesh all edges before we mesh a face and volumes can be meshed without meshing all the enclosing faces first.
Mapped Mesh
Mapping has the potential to create the very best surface meshes. The figure below shows a high-quality mapped surface mesh for one of the panels in the solar panel model. The mapped mesh is refined so that we obtain finer elements close to the free edges and smooth transitions to the fine meshes covering the beams. The anisotropy is obtained by using Distribution nodes, which contain settings to control the number of elements and their distribution along the edges. The fact that all elements have 90° angles means that the elements have no skewness at all.
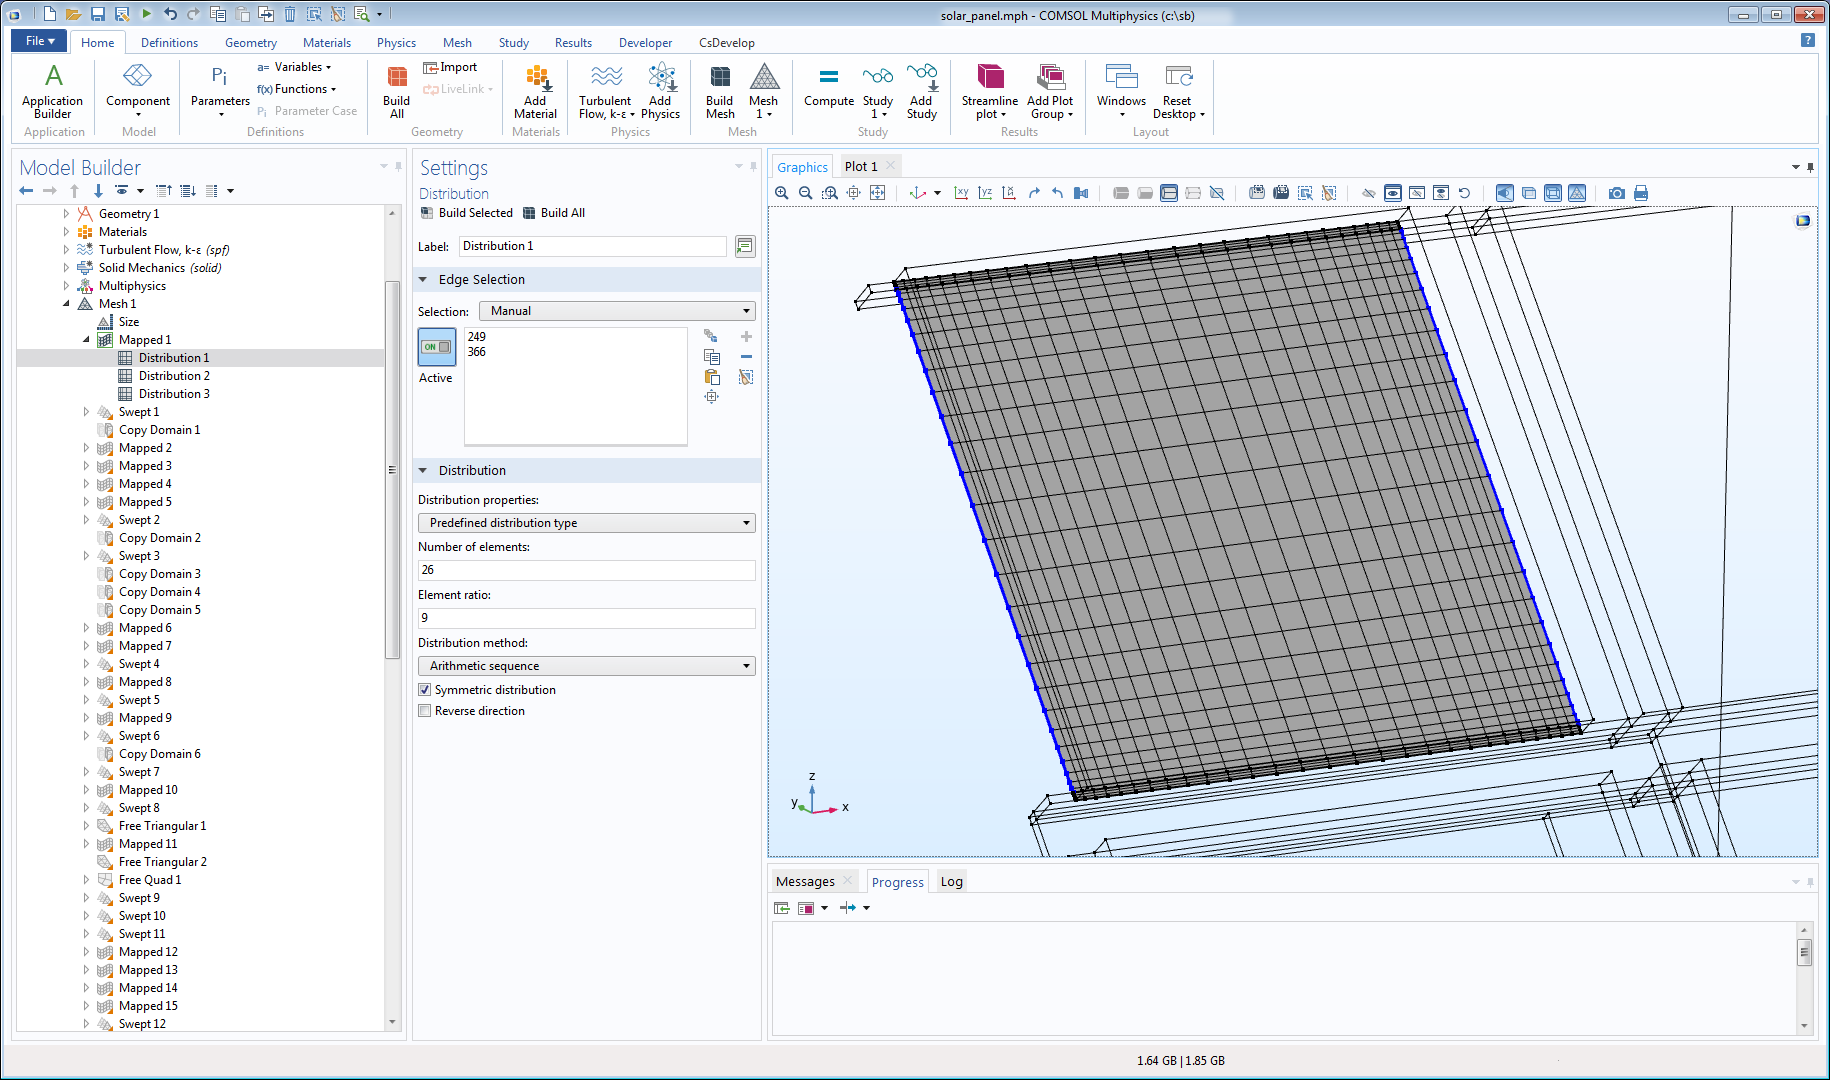
Mapped mesh on one surface of the solar panel model.
Mapped meshes can be particularly powerful for 2D simulations, such as the NACA 0012 airfoil benchmark shown below. The most appealing property of the mapped mesh for this model is the extremely good control it provides over element size, quality, and growth rate — even though it can require some work to prescribe the optimal distributions on all edges.
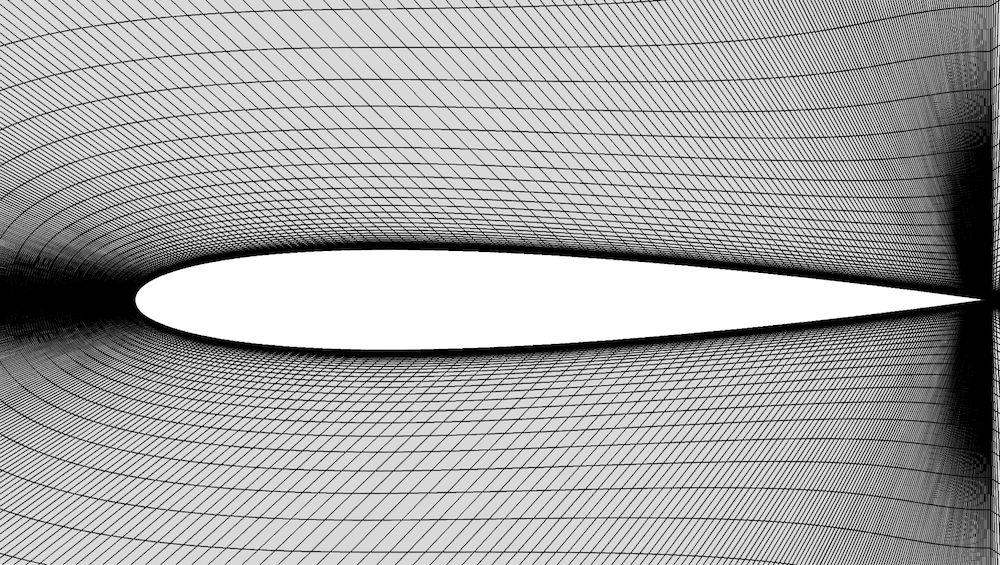
A mapped 2D mesh for the NACA 0012 airfoil model.
Unstructured Quad Mesh
Some surfaces are just too much trouble to divide into faces that can be mapped. In these cases, the Free Quad node is an option. The example below shows where the face of a frame is meshed by an unstructured quad mesh. The maximum element size on the face is controlled by a Size attribute, and Distribution attributes control the distributions along a number of edges.
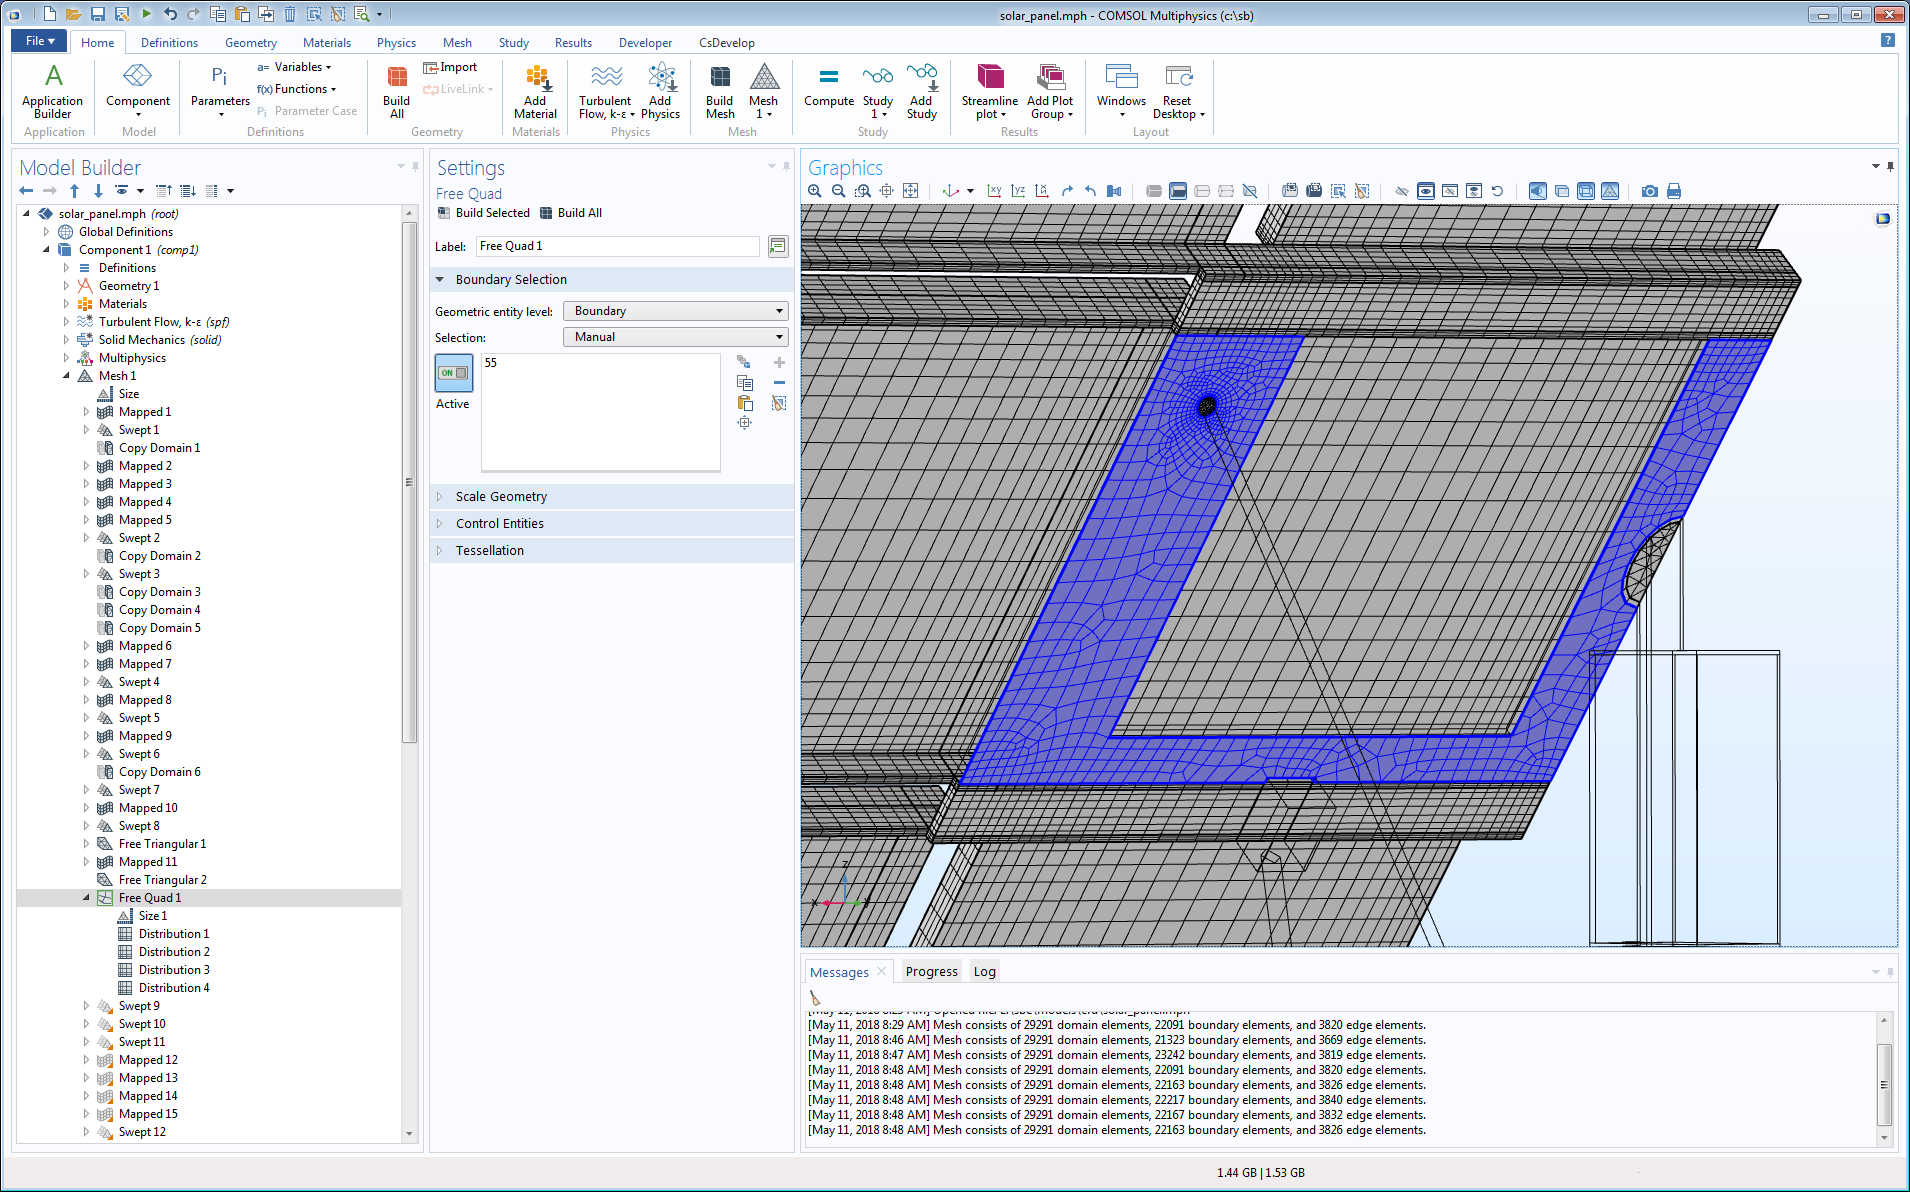
Unstructured quad mesh on a surface on the solar panel model.
This face could also have been meshed with a Free Triangular operation, but that would result in many more elements. We can also notice that the growth rate, measured from the adjacent mapped meshes, isn’t the very best. The frame is on the underside of the solar panel, so there isn’t much going on for flow, hence the mesh mainly impacts the structural mechanics part of the model for which growth rate isn’t an issue.
Triangular Mesh
The Free Triangular operation is the “workhorse” for 2D CFD models, as it is a quick and simple way to obtain meshes of high element quality that cover the whole geometry. The ease of creating unstructured meshes comes with a cost. Unstructured triangular meshes give more numerical diffusion than structured meshes. This means that solutions obtained on unstructured meshes are more smeared out than solutions obtained using structured meshes with comparable element sizes. Furthermore, unstructured meshes cannot be highly anisotropic without becoming skewed.
In general, unstructured meshes must be much finer than structured meshes to give the same level of accuracy for CFD problems. However, the extra diffusion can sometimes be desired, since it becomes easier to obtain convergence. This is perfect for a model like the supersonic ejector, shown below, where the mesh serves as a starting mesh for mesh adaption (see below).
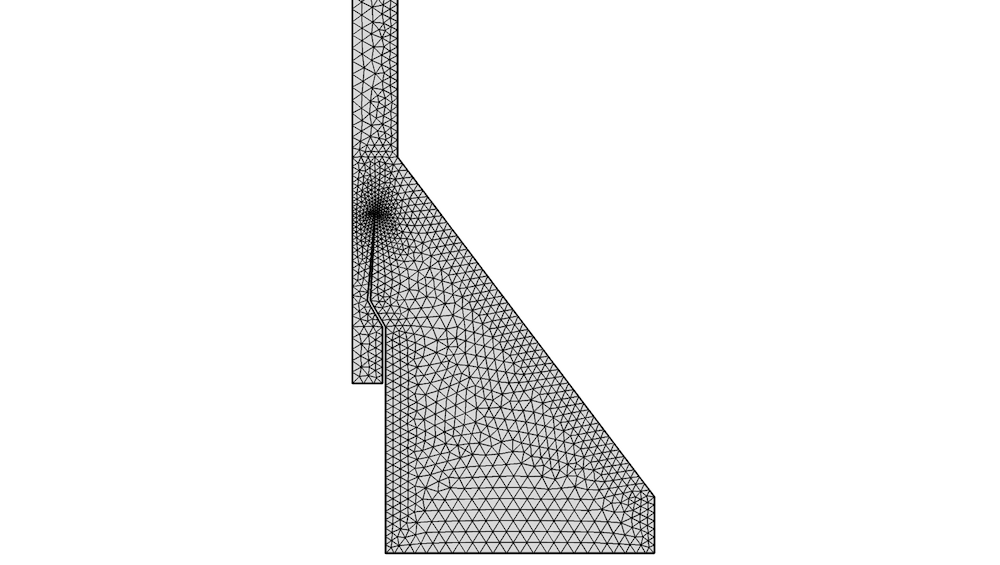
Triangular mesh for a 2D axisymmetric model of a supersonic ejector.
The Free Triangular operation has little use in 3D models. The main use is to “test mesh” individual faces; in particular, faces where we have applied virtual operations. We can investigate the mesh quality on individual faces without having to mesh the adjacent volume. Unstructured triangular mesh can also be useful as a starting point for swept meshes. Such a strategy results in a mesh consisting of prismatic elements whose quadratic sides can be stretched, thereby creating an anisotropic mesh.
Tetrahedral Mesh
Almost all geometries of industrial applications contain one or several domains that are just not practical to sweep. These domains must then be covered by a tetrahedral mesh. The Free Tetrahedral operation builds surface meshes on unmeshed faces before it builds volume meshes. The surface mesh must conform with geometry boundaries, but the Surface Mesh nodes can be moved around within the faces during element quality optimization. Faces that are already meshed, however, remain frozen and can therefore result in a lower element quality.
A tetrahedron only has triangular sides, so something is needed to transition from faces with quadrilateral elements. This “something” is the pyramid. A pyramid element is formally a hexahedral element where one of the element faces is collapsed into a point, leaving an element with one quadrilateral face and four triangular faces. The solar panel model has a lot of faces with quadrilateral elements, and consequently requires pyramids to transition to the unstructured mesh in the domain surrounding the solar panel, as shown below.
Sometimes, we hear that pyramids are inferior to other types of elements, but there is nothing that makes pyramids bad per se. However, when a pyramid is placed on an anisotropic quad, its base must have the same anisotropy. Any small disturbance of the pyramid shape will then result in an element with rather high skewness. This is shown below, where the pyramids placed on top of highly anisotropic quad faces at the edges of the panels typically have lower quality than the pyramids in the center of the panels. In this case, the lower quality is a price we happily pay for a much smaller overall mesh size compared to using unstructured meshes within the panels.
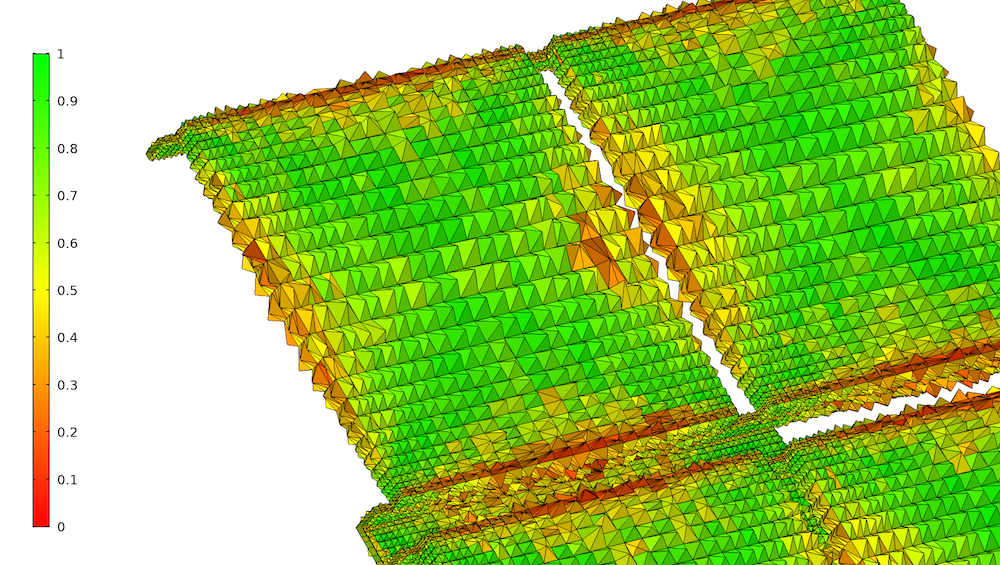
Pyramids placed on top of quadrilateral elements on the solar panel geometry. The elements are colored by quality calculated from skewness.
The control over the meshes generated by the Free Tetrahedral operation can be greatly improved by using mesh control domains. For the example shown below, the Size 3 attribute prescribes a small maximum element size on the slant and the back of the Ahmed body. The Size 1 attribute to Free Tetrahedral 1 prescribes a low growth rate in the mesh control domain, and this results in a fine mesh with low growth rate and high element quality in the wake region. When the surrounding air domain is meshed, the boundaries containing the mesh control domain are removed, leaving freedom for boundary layer mesh to be added and to move neighborliness elements.
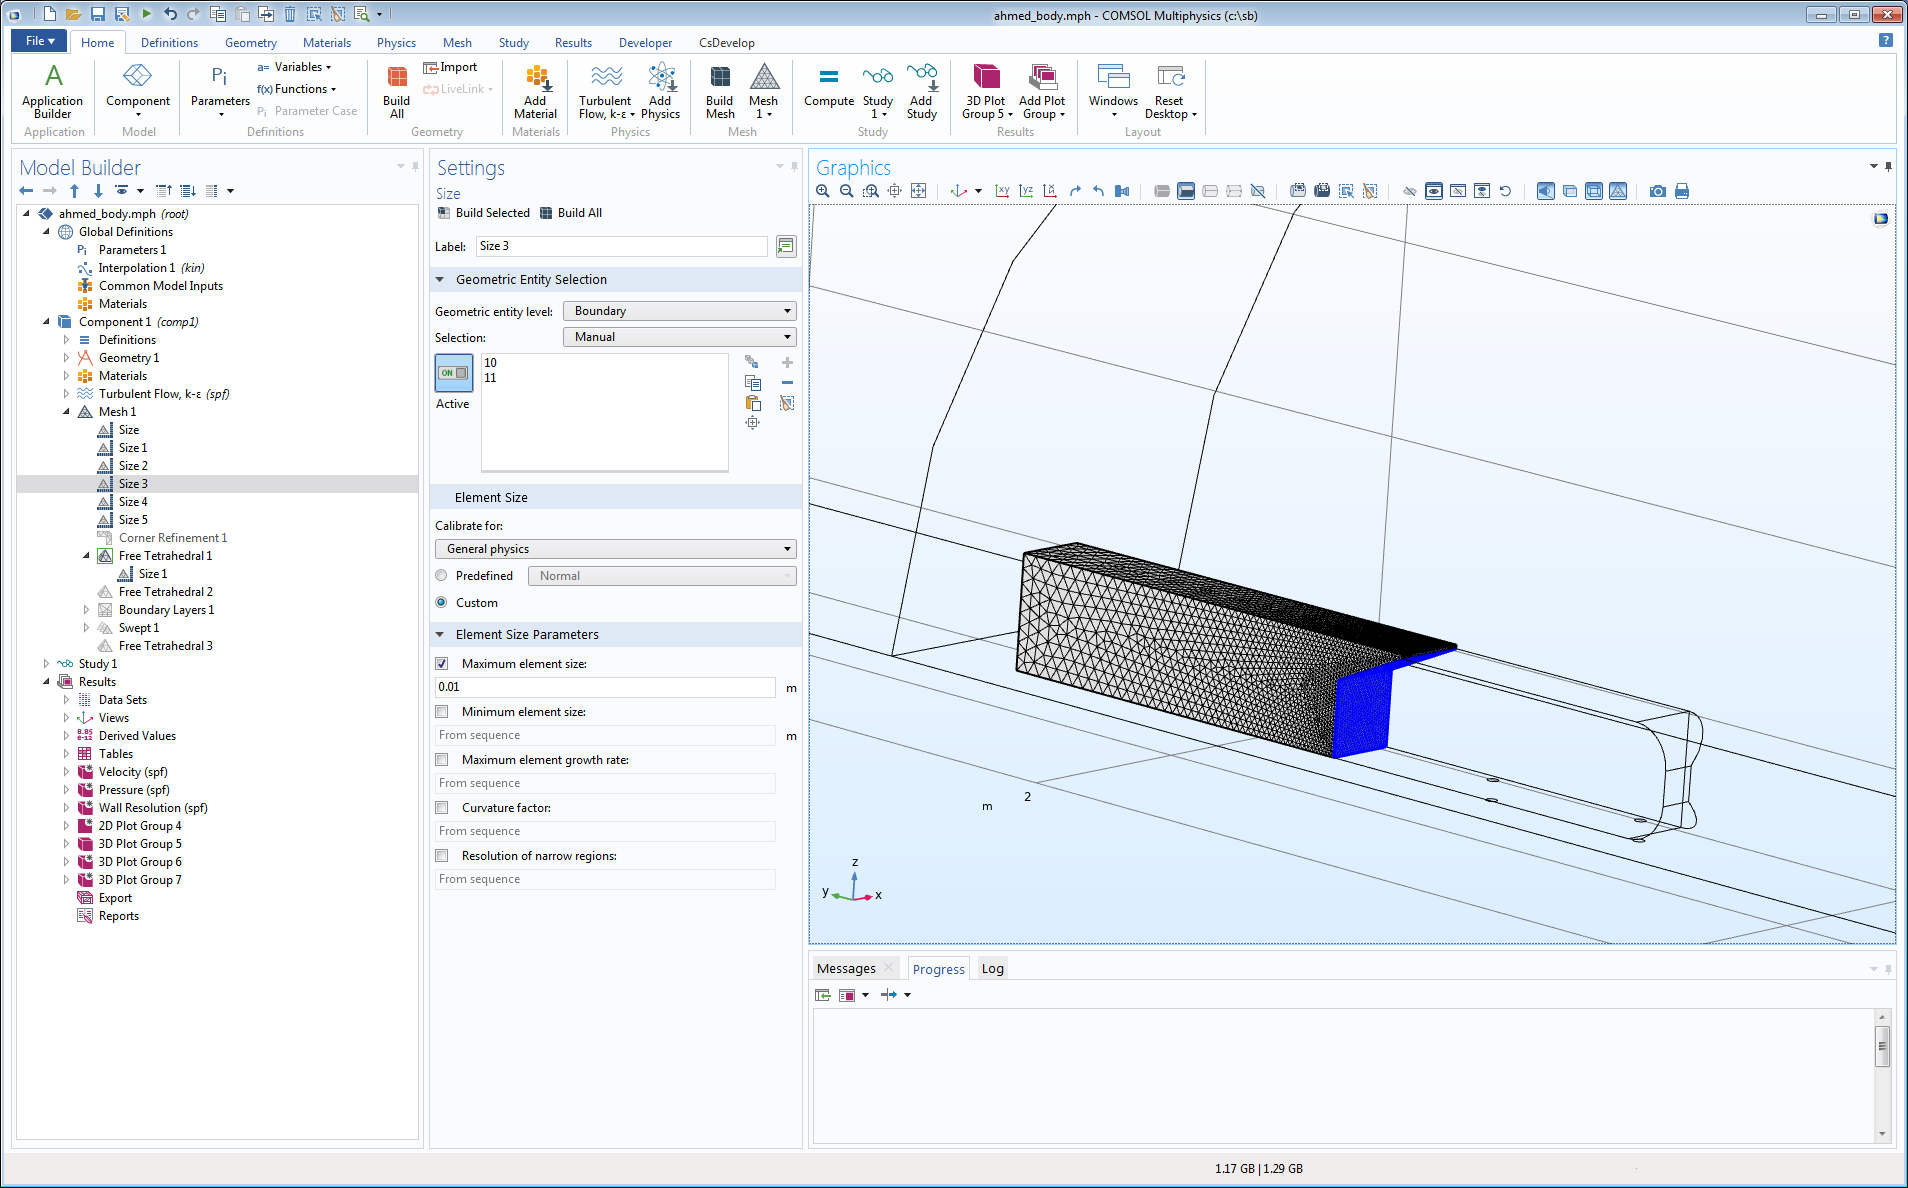
A mesh control domain behind the Ahmed body.
We could have considered a swept mesh for the mesh control domain above. That would make the transition to the rest of the unstructured mesh more difficult and would not actually improve things, since the swirling motions that we expect behind the “car” are relatively isotropic, meaning that a structured mesh would also need to be more or less isotropic.
Swept Mesh
The 3D correspondence to a mapped mesh is denoted swept mesh in COMSOL Multiphysics. Sweeping takes a set of source faces; meshes and projects them on a number of destination faces; and connects these faces using prismatic elements or hexahedral elements, depending on whether the source meshes have triangular or quadrilateral elements. Sweeping is perfect for obtaining meshes that are stretched in the streamline direction while retaining a given resolution in the cross-section plane.
An example is shown below, where a swept mesh is added in the downstream region of the wind tunnel of the Ahmed body model. An attentive person would point out that the growth rate between the unstructured tetrahedral mesh and the swept mesh close to the ceiling could be better. But the flow field will display almost no variations there, so it is more important to obtain a good growth rate in the wake behind the “car”.
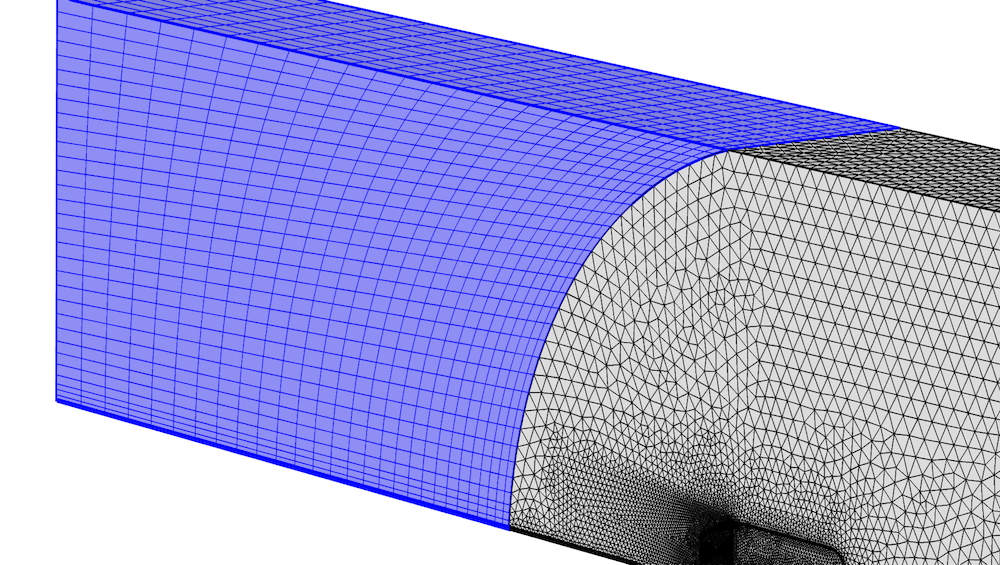
Swept mesh downstream of the Ahmed body.
The swept mesh above uses the face mesh from a Free Tetrahedral operation and a Boundary Layer operation as its source mesh. This is often a useful strategy. We could have created an unstructured triangular mesh on the outlet boundary and swept the mesh from the outlet up to the curved face. That would, however, put restriction on the Free Tetrahedral operation (see the “Triangular Mesh” section). We would also need to push in boundary layer elements along the whole wind tunnel floor, compared to only creating boundary layer mesh in the part with unstructured mesh and then sweep the result downstream.
Boundary Layer Mesh
Boundary layer meshing, central for CFD simulations, creates highly anisotropic meshes close to walls without having to use swept meshes or specially designated domains. These elements are needed because of the boundary layers that typically form at no-slip walls, as described in this previous blog post.
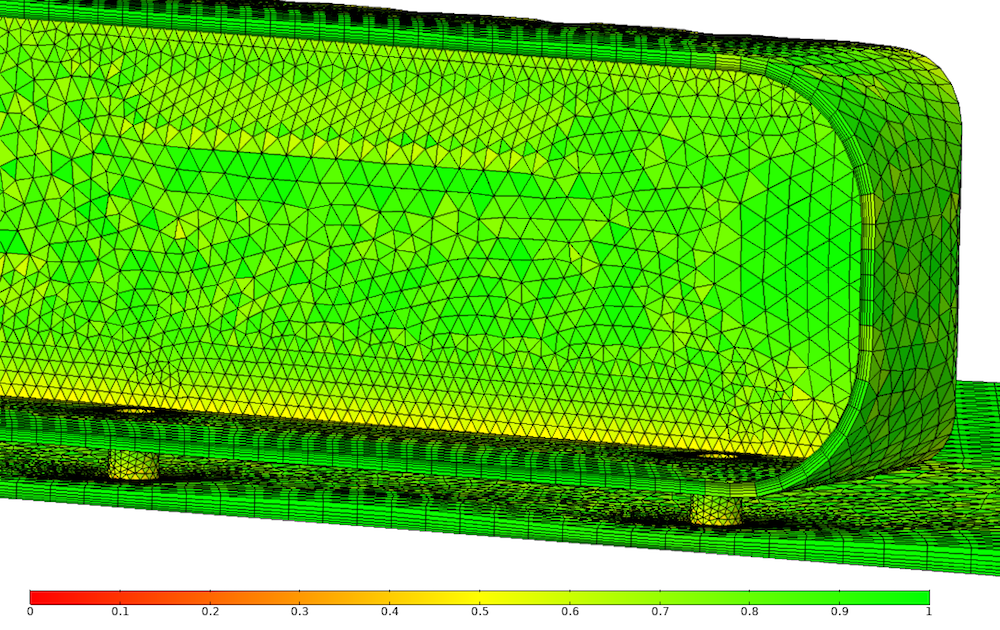
Boundary layer mesh for the Ahmed body model. The elements are colored by quality based on skewness.
In COMSOL Multiphysics, boundary layer meshes are added after the domain has been meshed. Anisotropic prismatic or hexahedral elements are pushed into the computational domain, resulting in a number of highly anisotropic elements as exemplified below. Observe that the quality of the elements is good despite the anisotropy. The reason is that the boundary layer mesh is in this case built from triangles with high quality, and that results in high-quality prismatic elements as well.
Boundary Layer Mesh Characteristics
The boundary layer mesh has three characteristics:
- Height of the first layer
- Growth rate
- Number of layers
The first is the height of the first element and it is often specified as a fraction of the length scale of the face element. A typical default is that the length scale of the face elements is 50 times larger than the height of the first boundary layer element. Higher aspect ratios have the potential to yield better resolution, but the resulting equation system can also be more difficult to solve, especially when using iterative solvers.
The second characteristic is the stretching factor; that is, the growth rate from one element layer to the next. This is necessary to obtain a decent transition to the unstructured mesh (as shown above). The jump in element size as the roof boundary layer transitions into the unstructured mesh is clearly visible. The boundary layer could do with either a higher stretching factor or more layers in the boundary layer mesh (the number of layers is the third characteristic of the boundary layer mesh). But the boundary layer mesh shown above cannot be much thicker, because the mesh in the gap between the car and the floor is already rather squished in order to avoid high skewness in the unstructured mesh. This compression of the boundary layer mesh is done automatically by the underlying algorithm.
Selecting the first element height, growth rate, and number of elements is a balancing act between necessary resolution, good transition to the unstructured mesh, and quality of the resulting elements.
Special Considerations for Sharp Edges
If you’ve wrapped your own gifts, you know how easily the paper can rip when tightened around sharp edges. Boundary layer meshes have similar problems, as shown below. The boundary layer mesh elements at the trailing sharp edge are rather skewed, as are the elements just downstream of the airfoil.

The sharp trailing edge of an airfoil with no special mesh treatment.
One option is to “split” the boundary layer at sharp edges. The result is shown in the middle image below. The boundary layer mesh now ends with two special columns of elements, both starting with a triangle followed by an appropriate number of quadrilateral elements. Splitting allows you to control how sharp a corner must be to be considered sharp, as well as the maximum angle that each “special” column of elements should cover. Optimizing these parameters can greatly improve the element quality at sharp edges.

Splitting the boundary layer at the sharp edges of an airfoil.
Splitting doesn’t always work. Complicated 3D CAD geometries, where any number of edges can connect to a sharp corner, are particularly difficult. The algorithm must be programmed for each topologically unique configuration, and it is likely that an advanced geometry contains at least one sharp corner that the algorithm doesn’t know what to do with.
The third way to treat sharp corners can then be an option. It is called trimming and is the default option for sharp corners in COMSOL Multiphysics. The result for the airfoil is shown below. As the layer approaches the sharp edge, it decreases in height with two elements for each element that comes closer to the edge. Alternatively, the method can be regarded as a growth of the number of boundary layer elements from the sharp edge. The number of elements to grow and the minimum angle for trimming can both be controlled in order to obtain an optimal mesh.
Trimming reduces the effective resolution at the sharp corner, compared to no treatment or splitting. Trimming should therefore always be combined with a general refinement of the mesh, which is why the Corner Refinement feature discussed above is included by default in the physics-induced mesh sequence.

Trimming, the default option for meshing a boundary layer with sharp corners.
Boundary layer meshes can increase the resolution in narrow regions. If you look closely at the mesh in the figure above, the region between the car and the floor is covered by 15 elements (6 + 3 + 6). This is enough to represent any velocity profile that can occur in that narrow region. Without the boundary layer mesh, the gap would be covered by only 3 elements, severely limiting the capability of the mesh to represent the flow profile beneath the Ahmed body. Then, the flow is typically artificially throttled so that the narrow region appears even more narrow numerically than it is geometrically. Boundary layer meshes can hence be of use, not only for turbulent boundary layers, but also in laminar and even microfluidic systems. A good rule of thumb: Narrow regions must be resolved with at least five elements across.
Copying Meshes
Finally, we will cover how to copy a mesh from one entity to another. This is possible for entities of the same dimension as long as the source mesh can be mapped on the destination entity by a translation, rotation, and an isotropic scaling. This means that the destination must have the same shape as the source, but it can be located in another place, rotated in some way, and possibly have a different size.
Copying mesh is particularly useful for mapped and swept meshes. Copying allows us to replace a number of map and sweep operations and a number of distribution attributes with one copy operation. This is possible if the geometry has been properly partitioned, as described in the previous blog post. In addition to saving work when creating the mesh, any subsequent change of the mesh is much easier to administrate, since you only need to change the sequence for the source domain. The copy operation automatically transfers these changes to the destination domains.
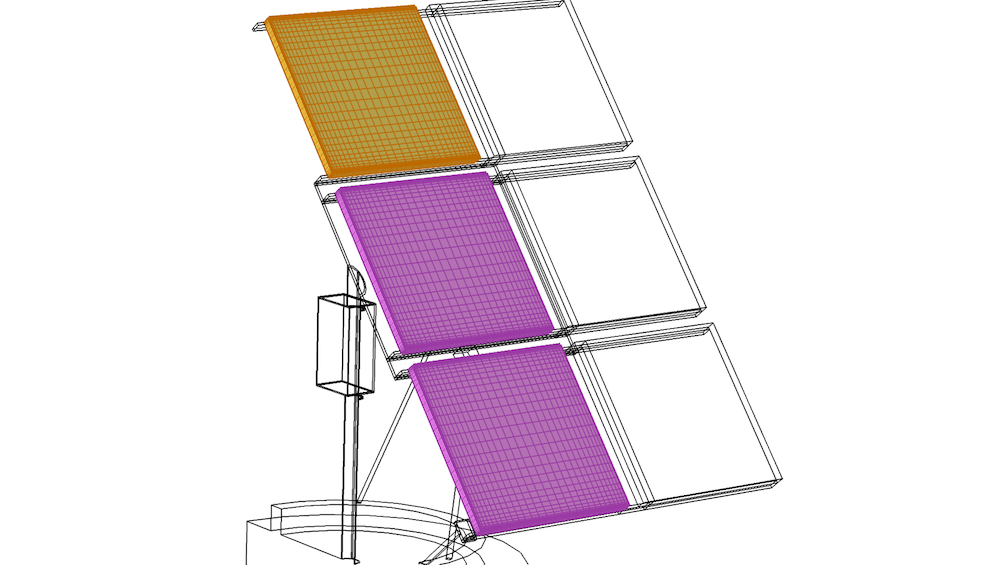
The swept mesh from the yellow domain is copied to the two pink domains.
Adaptive Meshing
When simulating CFD problems, we strive to create dense meshes in regions with large gradients. There are, however, cases when it is difficult to predict where the sharp gradients will appear. There are also time-dependent cases where the sharp gradients move. This could be addressed by creating fine mesh in all regions where the sharp gradients appear, but that is typically expensive. The solution is instead to invoke adaptive meshing.
Adaption for Stationary Problems
One example of adaptive meshing is in the pressure contours for a shock-system created by transonic flow over a wall-mounted bump. The shocks can be captured by the stabilization scheme, but coarse meshes would make them appear smeared out.
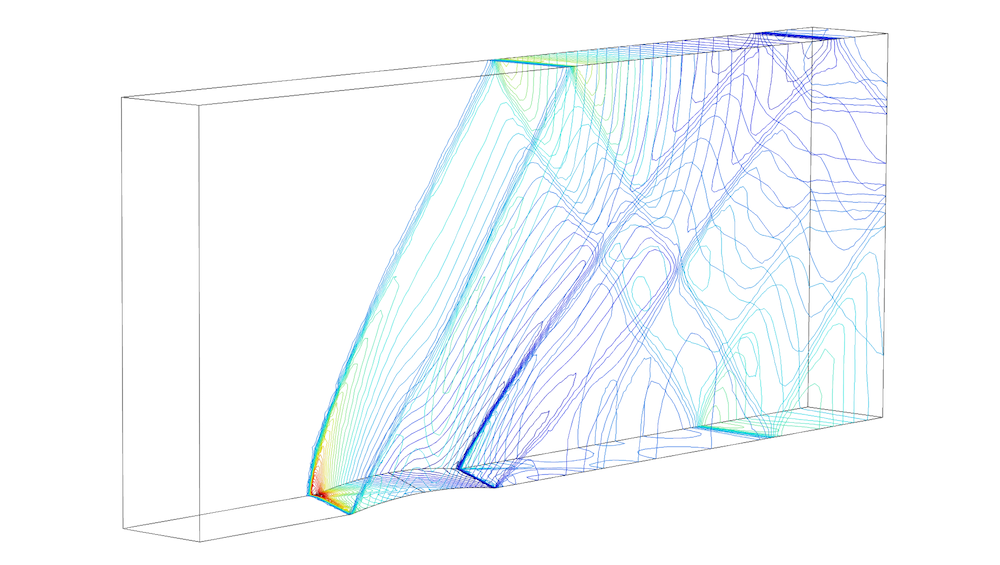
Pressure contours for Euler flow over a wall-mounted bump.
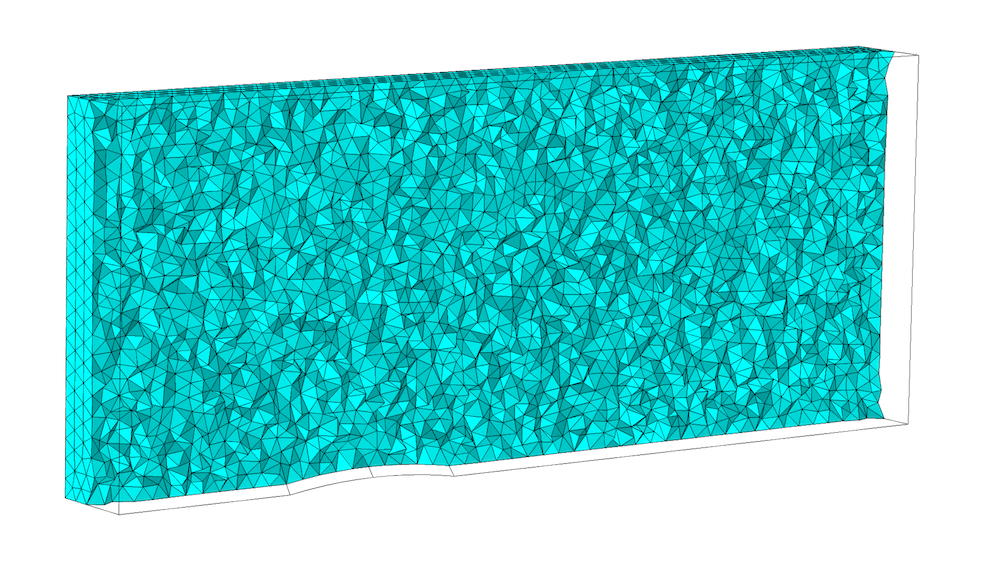
The sharp shocks in the figure above are obtained by starting from a homogeneous, relatively coarse mesh (shown below and to the left). The solution on the coarse mesh is used to approximate the equation residual and refine the mesh where the residual is large. The equations are resolved on the resulting finer mesh. This procedure can be repeated until satisfactory accuracy is obtained.
The mesh used to compute the pressure field above is shown below and to the right. It is the result of the very simple starting mesh being adaptively refined twice. Adaption still requires work to create the starting mesh, since the problem must converge on that mesh.
Starting mesh (left) and adapted mesh (right) for the Euler flow model.
Adaption for Time-Dependent Models
Adaption for time-dependent models works a bit differently. A coarse base mesh is used to advance the solution for a certain time interval. The solution is then used to refine the mesh based on some indicator function. Then, the adapted mesh is used to simulate the time interval again. Below, the left image shows the base mesh of an inkjet nozzle model and the middle image shows the adapted mesh. Since this is a two-phase model, the adaption is based on \|\nabla \phi\|, where \phi is the level set function (0 in one phase and 1 in the other). The right image shows the solution at the end of an adaption time interval. We can see how the refined mesh covers the transport of the interface front during the whole time interval.
Time-dependent mesh adaption for an inkjet nozzle.
Time-adaptive meshing can be a very cost-effective method for obtaining excellent results. The efficiency is highly dependent on the base mesh, which can’t be too fine, since the problem must be solved for an extra time on the base mesh. Putting some work into the base mesh, especially for more advanced geometries, often pays off.
Concluding Remarks on Meshing Tools for CFD Models
Creating a good mesh for CFD problems is an art. Even when using adaptive meshing, a high-quality mesh is the result of understanding how various meshing tools work and anticipating the expected solution to the flow problem.
The first mesh we create is rarely sufficient, and we often need to alter the geometry, the mesh, or both. Geometry and meshing sequences in COMSOL Multiphysics are helpful for this reason. A change introduced in the geometry sequence is propagated down through the model so that we don’t need to respecify the physics or mesh settings when introducing changes in the geometry. Or, we can substantially change mesh settings and rebuild the whole mesh sequence without starting over from scratch. Another possibility is to use parameters in both geometry and mesh and obtain a model where the mesh can be refined by a few clicks.
This series of blog posts has merely scratched the surface of the possibilities for creating meshes in COMSOL Multiphysics. There are many more settings and options than those mentioned here, and CFD models can benefit greatly from them.
Next Steps
Further Reading
Read more about meshing and CFD analyses on the COMSOL blog:





Comments (3)
Ze Zhang
November 14, 2018Hi. Thanks for sharing. May I ask can one also use boundary layer mesh to the visco-thermal loss modeling in the acoustic module?
SNIreaPER
July 15, 20211. “Since this is a two-phase model, the adaption is based on the change in phi, where phi is the level set function”- does COMSOL already take this into account as the criteria based on which the mesh refinement should be done?
2. Is it okay to start with a very coarse mesh?
Tony Hartley
October 19, 2021This would all be great, if using the mesher on anything more than trivial wasn’t so painful.