
How can you create an app, using the Application Builder, that can handle CAD import and let the app user interactively select boundary conditions? Do you need to know programming? As you will see in this blog post, not only can you do so in a series of easy steps, but you also don’t need a single line of code to do it! All you need is to use standard operations in the Form Editor available in the Application Builder.
The CAD Import and Selections App in Action
A screen recording of the app we will discuss in this blog post.
Selections in the Model Builder
Selections will be central to creating the app demonstrated in this blog post, so let’s start by reviewing the concept of selections and how they are used in the COMSOL Multiphysics® software.
In the Model Builder, named selections let you group domains, boundaries, edges, or points when assigning material properties, boundary conditions, and other model settings. You can create different types of selections by adding subnodes under the Component > Definitions node. These can be reused throughout a model component.
As an example of how selections can be used, consider selections for boundary conditions. When you select which boundaries should be associated with a certain boundary condition, you can click directly on those boundaries in the Graphics window of the COMSOL Desktop® environment. This is the default option, called Manual selection. These boundaries will then be added to a selection that is local to that boundary condition.
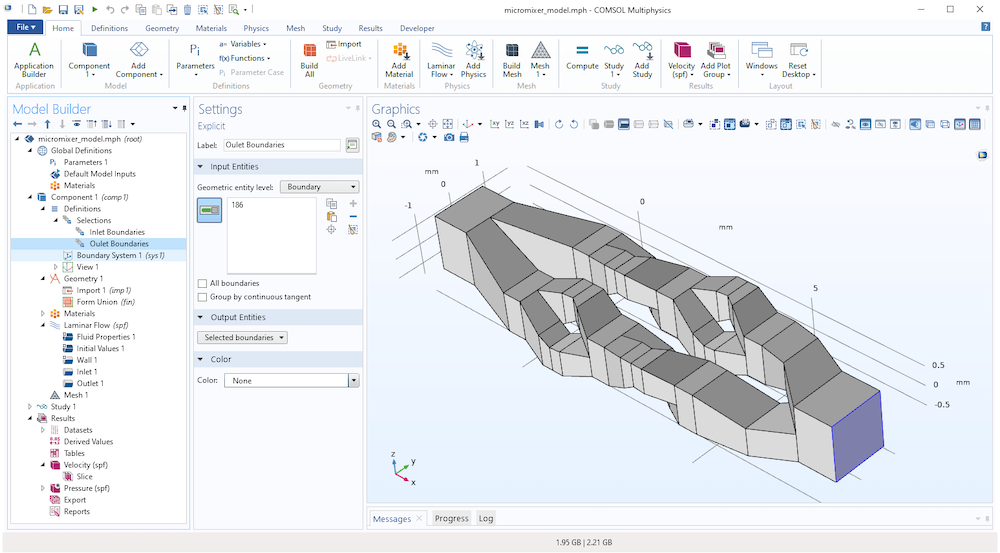
Manual selection of an outlet flow boundary with boundary number 186.
Named selections instead let you define global selections that can be reused for several different kinds of boundary conditions by just selecting from a drop-down list. The figure below shows the definition and use of an Explicit selection given the name Outlet Boundaries with the associated boundary number 186.
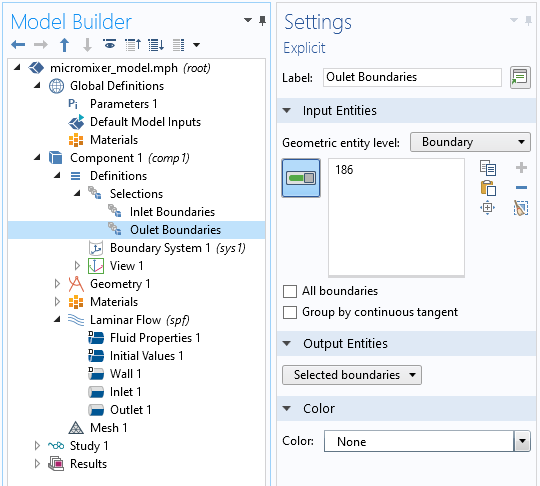
The definition of an Explicit selection given the name Outlet Boundaries for boundary number 186.
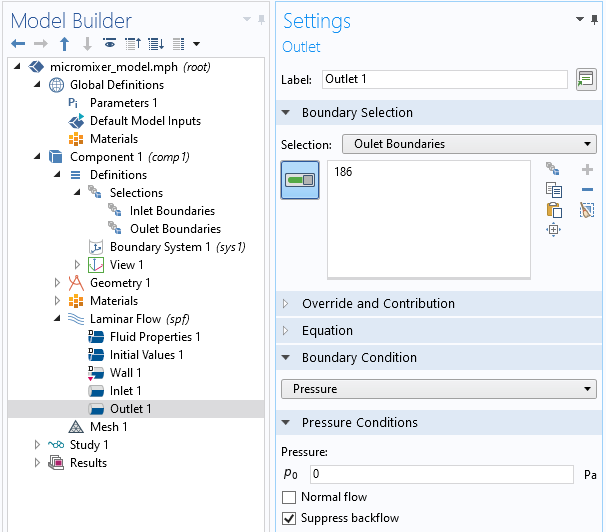
The use of the Outlet Boundaries selection for a Laminar Flow boundary condition of type Outlet.
Preparing a Model for App Creation
In order to exemplify CAD import and selection usage, we will use the Micromixer tutorial model from the Application Library of COMSOL Multiphysics. In the Application Library, the original model is available at the location COMSOL Multiphysics > Fluid Dynamics > micromixer.
The model simulates a laminar static mixer with two parallel cascades of split-reshape-recombine mixing elements. Each mixing element doubles the number of fluid layers, resulting in a fast mixing process. The output is the scalar mixing quality computed as the relative variance of the concentration profile at the outlet.
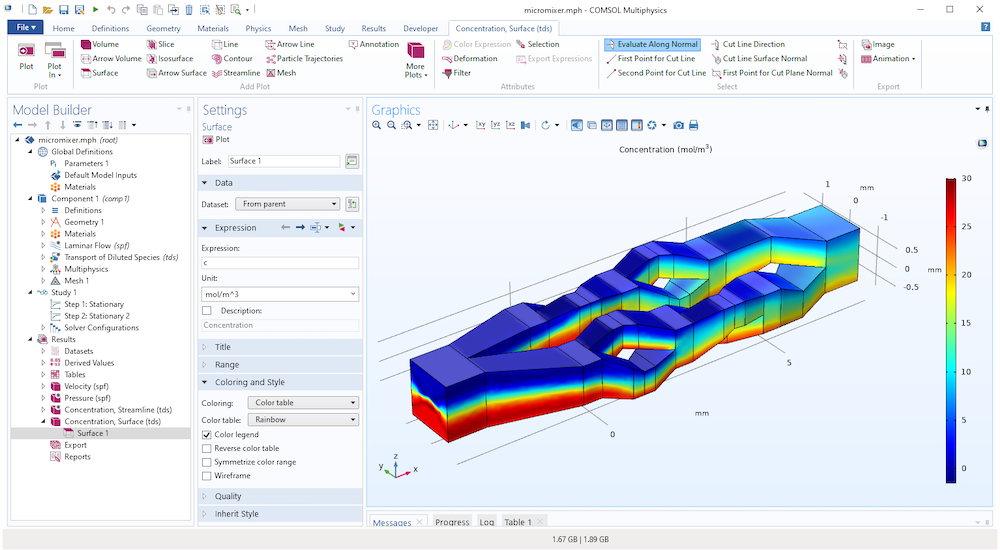
The Micromixer model from the Application Library of COMSOL Multiphysics®.
We will use a modified version of this model as the basis for our application. Although this is a microfluidics model, the techniques used here are generic and applicable to any model.
The model in the Application Libraries builds the geometry by using built-in features in COMSOL Multiphysics. However, we will use a different version here that is based on CAD import.
Start by downloading and opening the corresponding file, micromixer_prepared.mph, which is available in the list of files associated with this blog post.
This model has a CAD Import node in the Geometry sequence, as shown in the figure below.
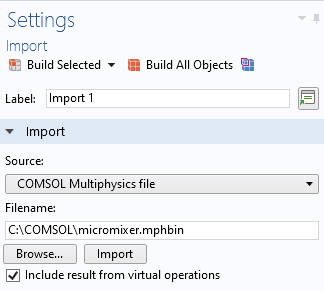
The CAD Import Settings window, showing import of a native COMSOL geometry.
If you have an add-on product that gives you access to the CAD kernel (the CAD Import Module, Design Module, or one of the LiveLink™ products for CAD), then the app will allow you to import CAD files on a wide variety of industry-standard CAD formats.
In order to make the app independent of the scale of the imported CAD file, the model also has a Scale operation with an associated parameter geometryScale, as shown in the figure below.
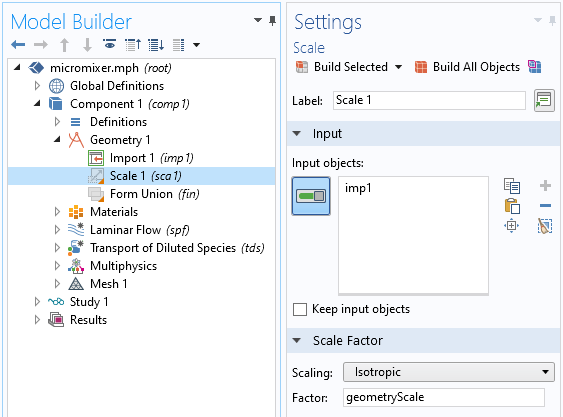
The Settings window for the Scale operation.
A geometryScale value of 1 assumes that the imported CAD file is defined in micrometers. The default geometryScale value of 1000 assumes that the imported CAD file is defined in millimeters.
The model micromixer_prepared.mph has two Explicit selections, Inlet Boundaries and Outlet Boundaries, as described in the beginning of this post. These selections are applied to the inlets and outlets of both the flow and mass transport parts of the model.
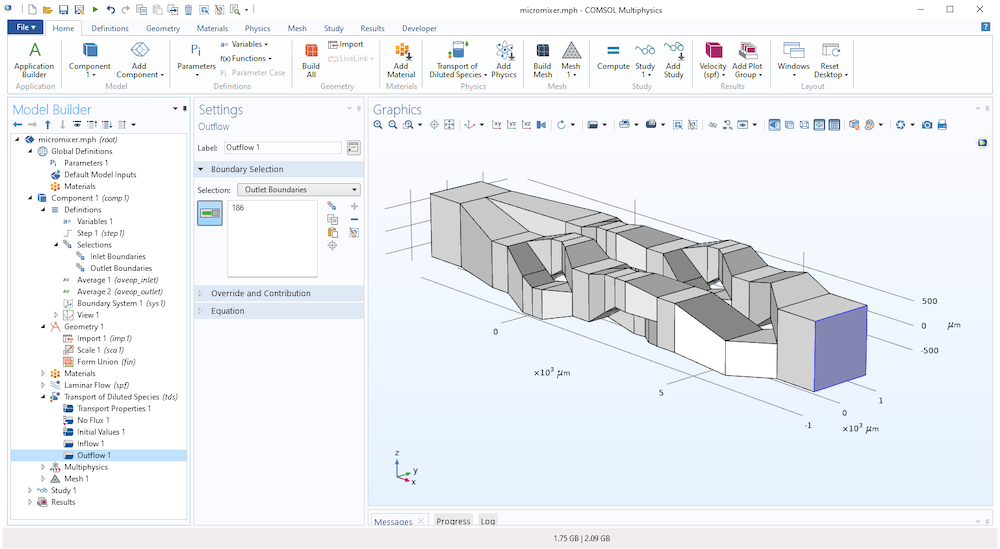
The Outlet Boundaries selection applied to the Outflow boundary condition of the Transport of Dilute Species interface.
Using the New Form Wizard to Create a First Version of the App
Now, let’s create an app based on the Micromixer model. From the Home tab, switch from the Model Builder to the Application Builder and click New Form. This opens the New Form wizard.
In the Inputs/Outputs page, change the Form title to Main and the Form name to main. Then, make the following parameters available in the form by double-clicking in the tree to the left (see figure below):
- Inlet concentration
- Diffusion coefficient
- Mean velocity
- Geometry scale
In addition, double-click the Global Evaluation node to display the computed mixing quality.
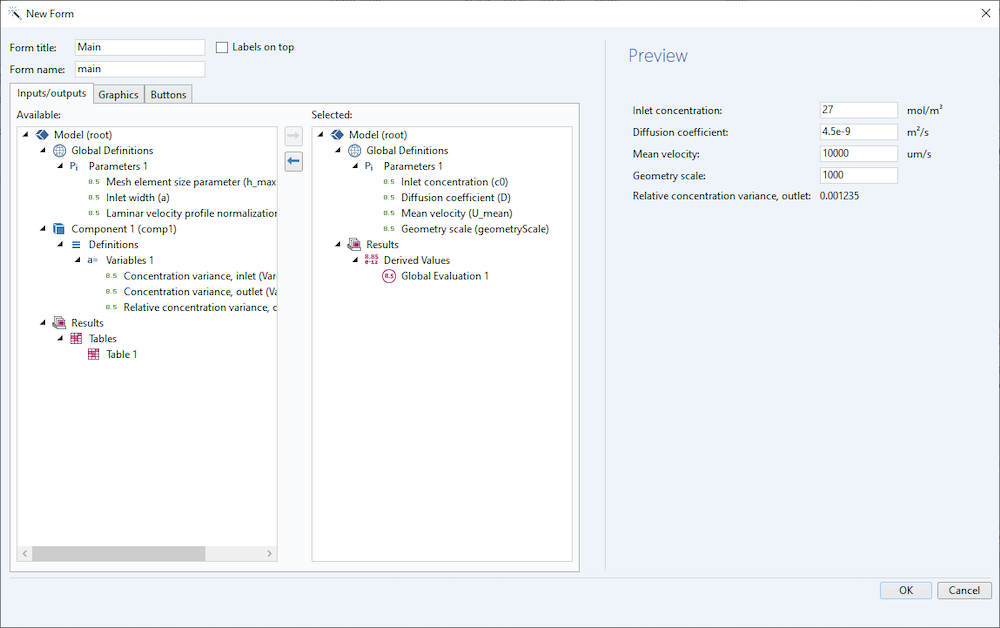
The Inputs/Outputs page in the Form Wizard.
In the Graphics page, double-click Concentration, Surface (tds) to make this the default graphics output.
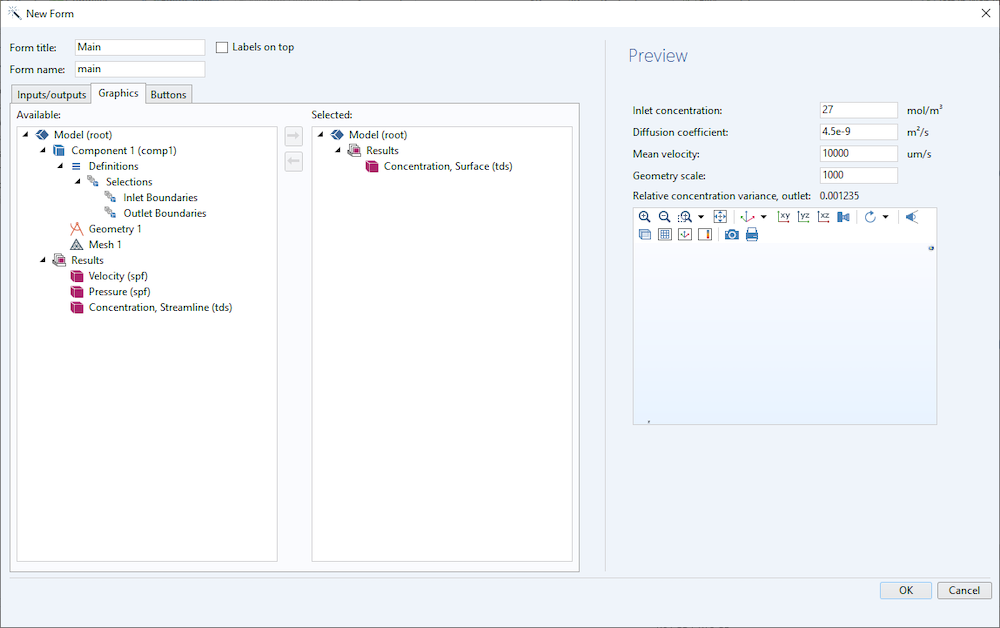
The Graphics page in the Form Wizard.
In the Buttons page, double-click Compute Study 1 to make a Compute button available.
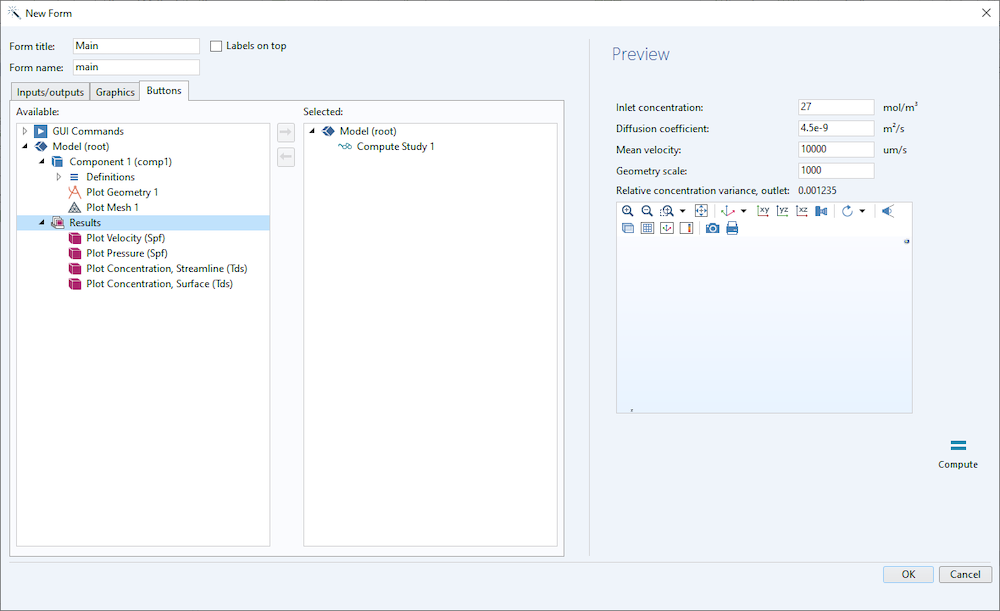
The Buttons page in the Form Wizard.
Click OK to exit the Form Wizard.
In the Form Editor, use drag-and-drop to place the Graphics object and the Compute button according to the figure below. Click-and-drag to resize the Graphics object to make it a bit larger.
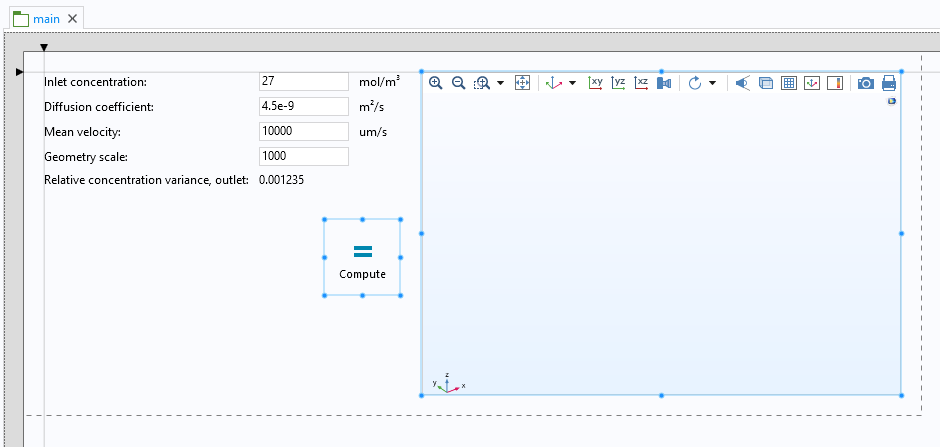
The initial app layout in the Form Editor.
As the next step, switch the application layout mode to Grid mode. Make the Graphics object resizable by selecting Grow Column, Grow Row, Align > Fill Horizontally, and Align > Fill Vertically. For detailed instructions on how to do this, see pages 116–117 in the Introduction to Application Builder (version 5.5).
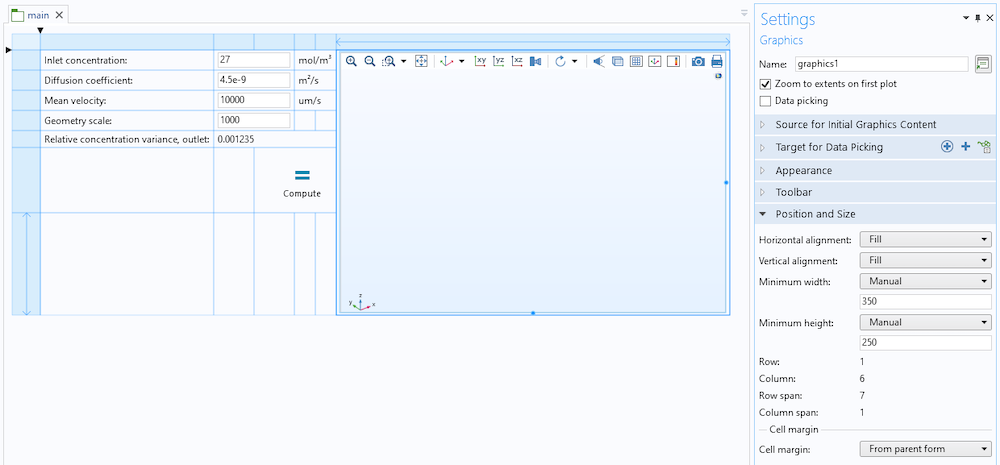
Grid layout mode with a resizable Graphics object.
Now, run the app by clicking Test Application in the ribbon. We already have a pretty interesting app where we can easily compute and get results for a variety of inputs.
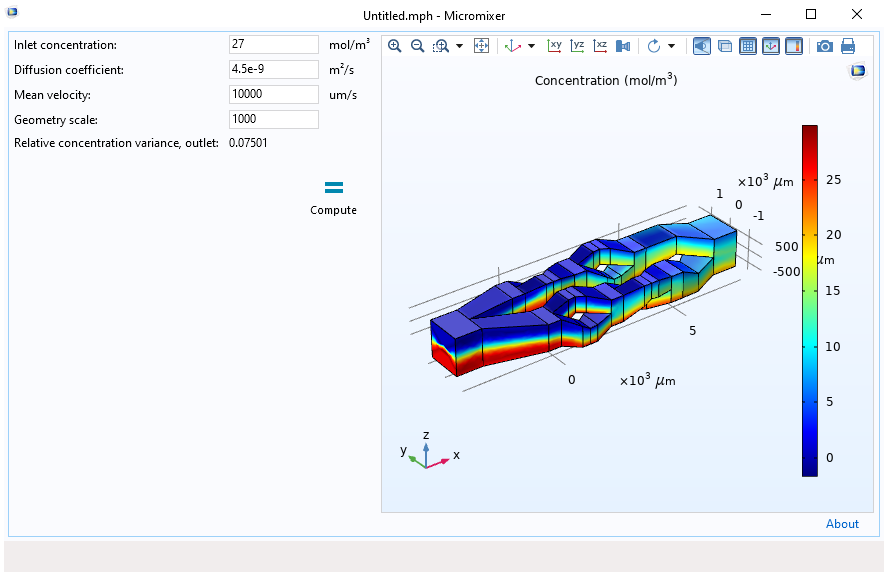
The first version of the micromixer app.
It may be more convenient to have the entire app window maximized when running it. To enable this, in the Application Builder, click the Main Window node in the application tree and in the Settings window, in the Size section, select Maximized for Initial size.
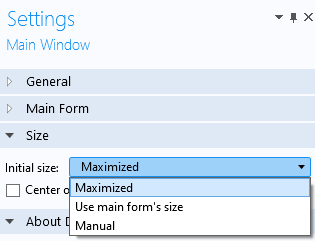
The Initial size setting for the Main Window settings.
Enabling CAD Import
To enable CAD import in the app, we will add a dedicated button that will open a file browser and perform the import. To give room for additional buttons, add a new row to the form below the last input field for the Relative concentration variance, outlet, according to the figure below.
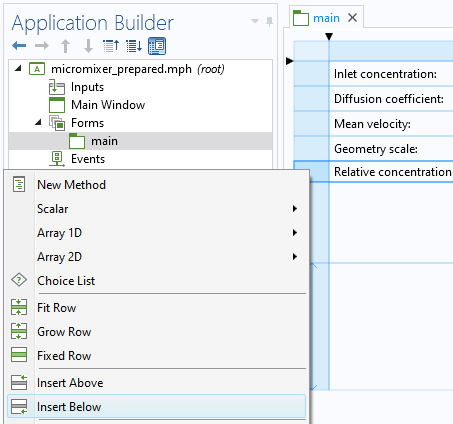
Adding another row to the form.
Click to select the leftmost cell in the new row, according to the figure below.

A selected cell in the main form having a deeper blue color.
While having the empty cell selected, in the Form tab, select Insert Object > Input > Button.
In the Settings window for the button, change Text to Import, use the icon named import_32.png, available from the Image library (click the “+” button to the right of the icon), and change Size to Large (or use another icon).
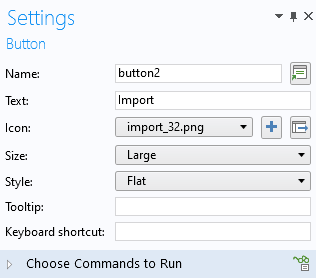
The Settings window for the Import button.
Right-click the button and select Align > Align Right to better position the button.
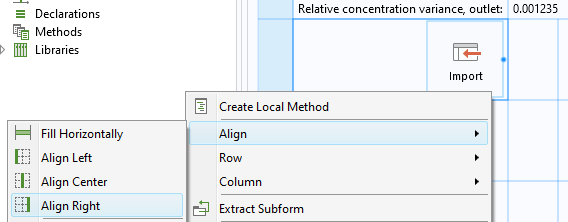
The CAD Import button, aligned to the right.
The layout of the button is now ready. The next step is to associate an action, or command, to the button.
Click the Import button to see its Settings window. In the Choose Commands to Run section, navigate to and double-click Model > Component 1 > Geometry 1 > Import 1 > Filename (filename).
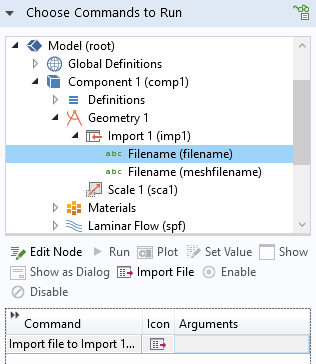
Adding Import file to the command sequence of the Import button.
Similarly, navigate and double-click Model > Component 1 > Geometry 1 and GUI Commands > Graphics Commands > Zoom Extents, to add these operations to the Command sequence. In addition, use the Edit Arguments button, below the Command sequence, or type in by hand, main/graphics1 in the Arguments fields for both the Plot Geometry 1 and Zoom extents commands, according to the figure below.
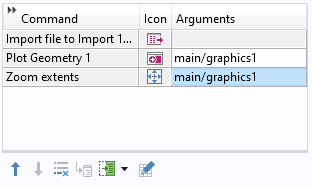
The argument main/graphics1 sends the graphics output to the corresponding Graphics object in the app. The Zoom extents command ensures that the entire CAD model is visible in the graphics window regardless of its scale.
You can now run the app by clicking Test Application and import one of the MPHBIN-files available for download in the files associated with this blog post.
To be able to easily change the scale of the imported CAD model by using the Scale parameter, we need to be able to rebuild the geometry object at the new scale and visualize it. We can do this by adding another button for displaying and building the geometry. This can most easily be done by using the Editor Tools window. You open the Editor Tools window by clicking the corresponding button in the Form tab of the ribbon. Now, click the empty cell to the right of the Import button in the Editor Tools window, navigate to and right-click Model > Component > Geometry, and select Button.
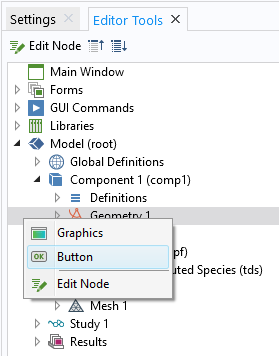
Adding a Plot Geometry button using the Editor Tools window.
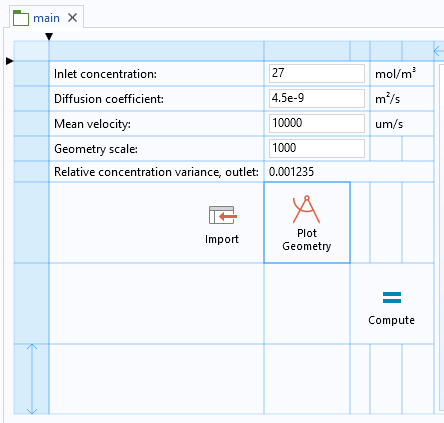
The Plot Geometry button in the main Form.
To automatically adjust the Graphics axes after the imported CAD model has been scaled, add a Zoom extents command to the command sequence in the settings window for the Plot Geometry button, according to the figure below.
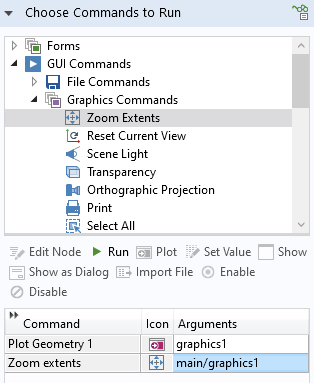
The Command sequence for the Plot Geometry button.
Selecting Boundaries
Let’s now add two buttons for selecting boundaries: one for Inlet Boundaries and one for Outlet Boundaries.
Click the leftmost empty cell in the same row as the Compute button.
Using the Editor Tools window, navigate and right-click Model > Component 1 > Definitions > Selections > Inlet Boundaries > Button.
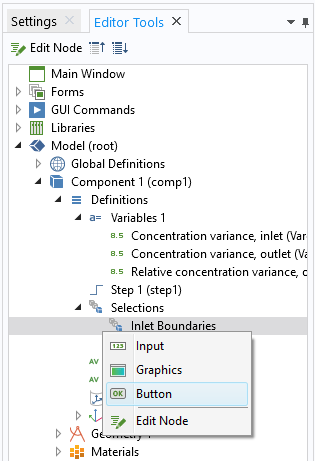
This adds a Plot Selection button to the selected cell. Right-click and select Align > Align Right to better position the button.
Double-click the Plot Selection button and in its Settings window, change the Text to Inlet.
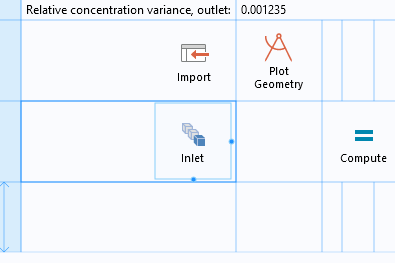
The Inlet selection button for the Inlet Boundaries.
Repeat the above to create an Outlet button by navigating and right-clicking Model > Component 1 > Definitions > Selections > Outlet Boundaries > Button and by changing the corresponding Text of the button to Outlet, according to the figure below.
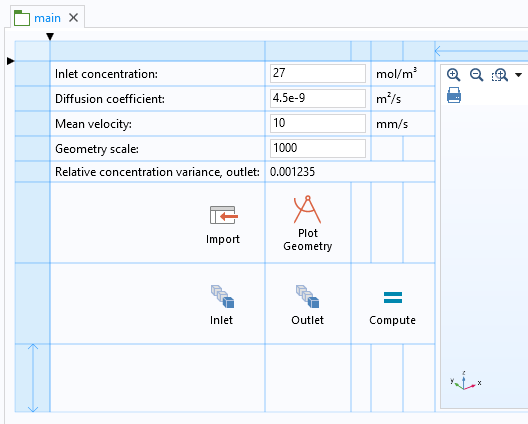
The Inlet and Outlet buttons for boundary selections.
When clicked, the Outlet selection button makes the Graphics object interactive so that it allows you to click boundaries, just like in the Model Builder, for selecting one or more boundaries for the Outlet Boundaries selection. This is reflected in the Command sequence by the Plot Outlet Boundaries command with graphics1 as argument, as shown in the figure below, and similarly for the Inlet button.
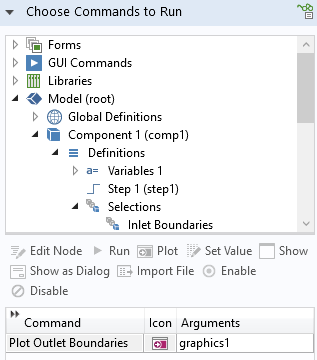
The Command sequence for the Outlet button.
To see how the user interface appears after a selection button is clicked, see the end of this blog post, where this is shown for a more sophisticated version of the app.
Before using the new selection buttons, we also need to use the selections in the average operators used to compute the mixing quality. In the Model Builder, go to Component 1 > Definitions > Average 1 and Component 1 > Definitions > Average 2 and change the Selection to Inlet Boundaries and Outlet Boundaries, respectively, according to the figure below.
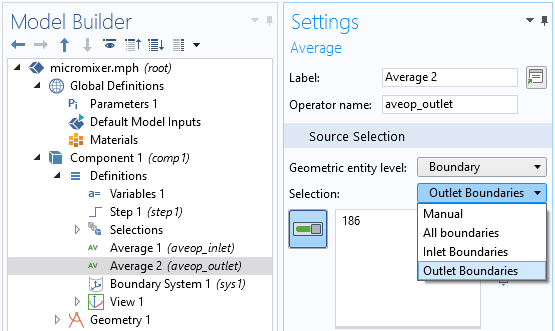
The Selection settings for the boundary average operators.
Parameterizing the Inflow Step Concentration Profile
For the user to be able to control the concentration step at the inlet boundary, which is used to measure the mixing quality, we need to parameterize and make available this expression to the user. To represent the characteristic (order of magnitude) width of the microfluidic channel, start by introducing a Global Parameter channelWidth with default value 1400[um], according to the figure below.
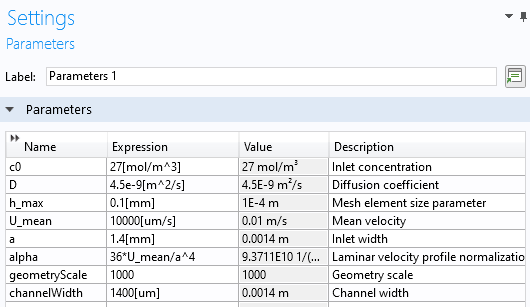
The Global Parameter for channel width.
Locate the Settings window for the step function Component 1 > Definitions > Step 1. In the section for Smoothing, for the Size of transition zone, enter channelWidth/10. This ensures that the transition zone for the step function, when increasing from 0 to 1, is 10% of the channel width. A too-sharp transition may cause convergence problems for coarse meshes. Later in this post, we will see how to use this step function to define a custom concentration profile.
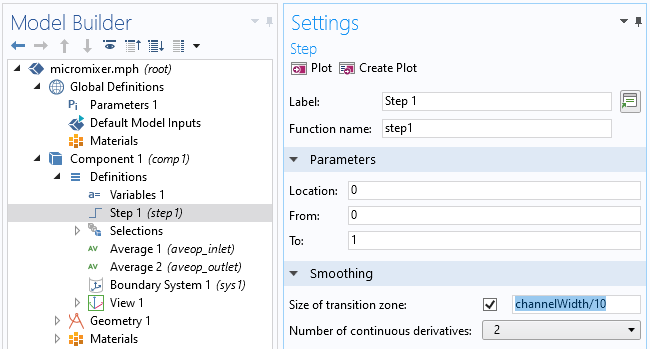
The transition zone setting for the step function.
Next, in the Concentration settings for the Inflow boundary condition, replace the expression with cStep.
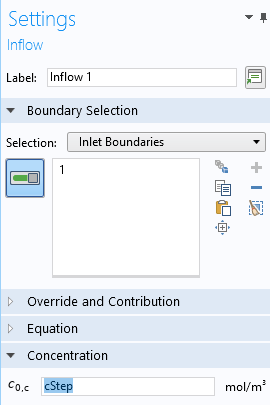
The variable cStep used for the Inflow concentration.
In Component 1 > Definitions > Variables, define the new variable cStep with the Expression equal to c0*step1(-z[1/m]).
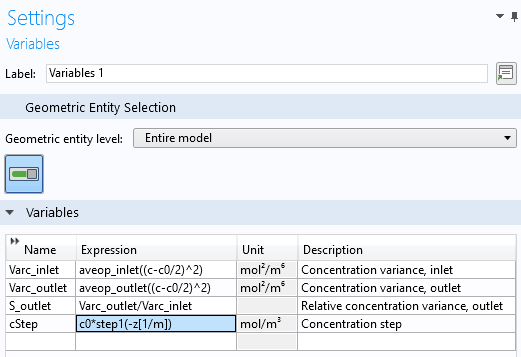
The definition of the variable cStep.
In the Application Builder, for the main form, add two new rows below the Geometry scale input field and use the Editor Tools window to add inputs for the Channel width parameter and the Concentration step variable, respectively, according to the figures below. In order to place and fit the new input fields, you may need to use the Merge Cells tool in the ribbon of the Form Editor. Use Shift+Click to select multiple cells and then click Merge Cells. You may also need to drag to expand the column for the input fields to fit the new variable expression for the Concentration step. For more information, see the Introduction to Application Builder.
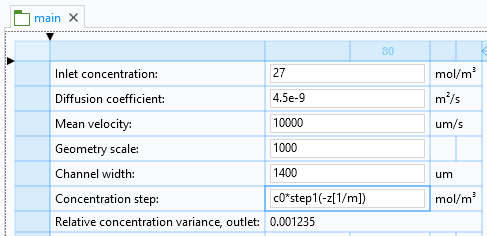
Two new rows with the Channel width parameter and Concentration step variable expression.
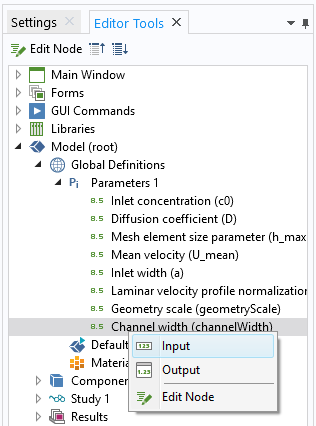
Adding the Channel width parameter to the form.
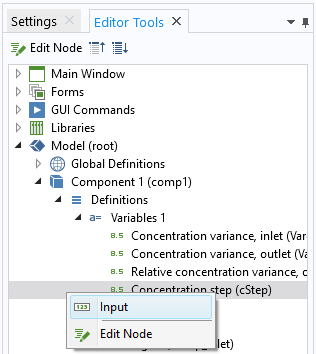
Adding the Concentration step variable expression to the form.
Controlling the Element Size Using Data Access
To let the user control the element size, enable Data Access by clicking the corresponding button in the Developer tab of the Model Builder. This lets you access the Size property for the element size and use that in the app.

Using Data Access to enable access to the Predefined element size property.
In the main form, add another row below the concentration variance output. Click the leftmost cell in the newly added row and use the Editor Tools window to add an Input for Predefined Size.
In the Editor Tools window:
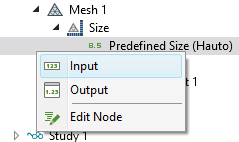
Using the Editor Tools window to add a Combo Box object for Predefined Size.
This adds a Combo Box object for the Predefined size, as shown in the figure below. Note that you may need to use Merge Cells to get the desired layout.
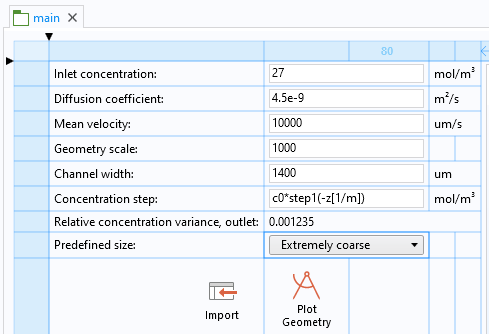
The Predefined size option in the main form.
This basic version of the app is now ready. If you don’t want to follow all of the steps, you can instead download the app from the set of files associated with this blog post. The filename is micromixer_basic_app.mph.
Testing the App
To test the app, import the CAD file split_recombine_mixer.mphbin and use input parameters as shown in the figure below. These parameters will reproduce the results of a tutorial model available in the Microfluidics Module.
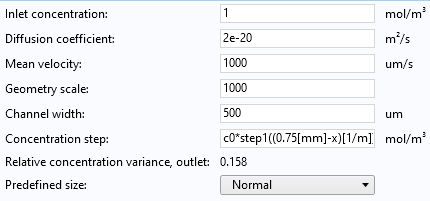
The input parameters for the split-recombine micromixer model.
The expression c0*step1((0.75[mm]-x)[1/m]) defines a Concentration step in the x direction with the transition zone located in between the two inlet boundaries. Specifically, the transition zone is 10% of the Channel width value of 500 μm. This implies that the Concentration step expression value is rapidly increased from 0 to 1 over a region 50 μm wide in the region between the inlet boundaries, ensuring concentration values of exactly 0 and 1 for the left and right inlet, respectively. The unit expression [1/m] ensures that the input argument to the step function is unitless.
The result after computation is shown in the figure below. In this case, the relative concentration variance is 0.158.
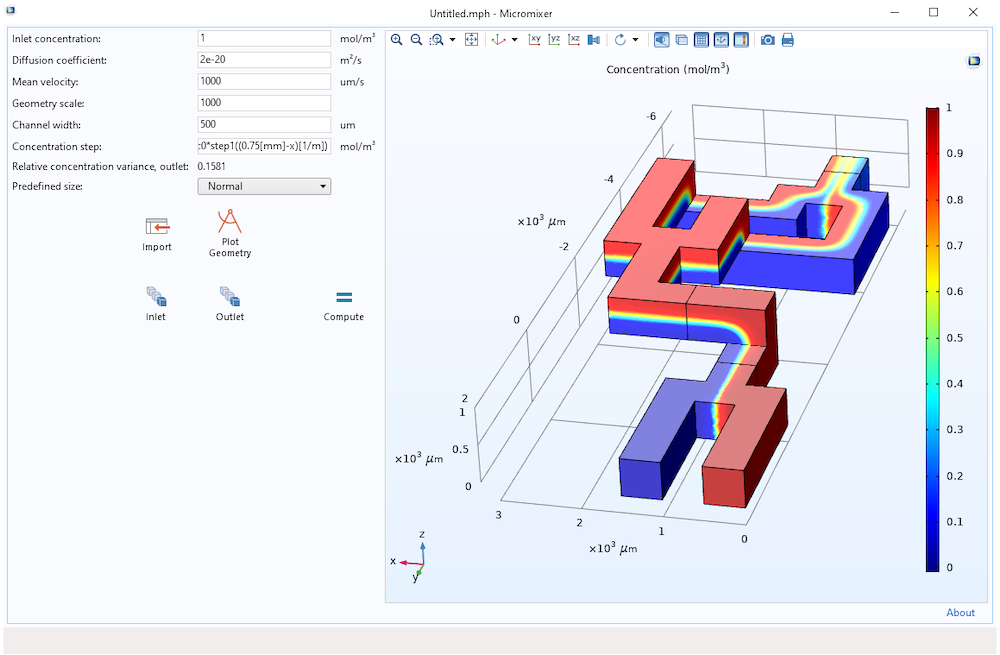
A split-recombine micromixer simulation using the ad-hoc designed app with user-defined CAD import and selection functionality.
Enabling Other CAD Formats
In order to enable CAD import of any available format, depending on the add-on products, we need to explicitly enable any file format for the CAD Import node in the Geometry sequence in the Model Builder. To do so, enable Data Access in the same way as described above when enabling user element size control. In the Import settings window, select the check box next to the Source and change to Any importable file, as shown in the figure below. The options available here will depend on which add-on products are available.
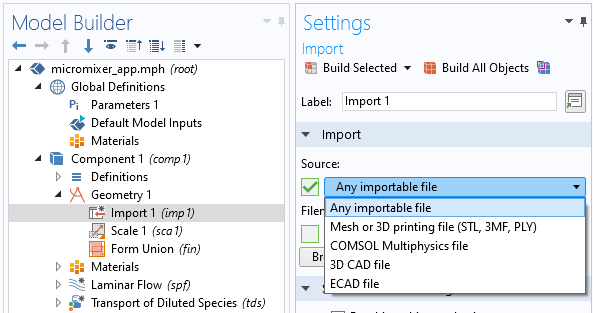
Enabling any importable file for CAD import.
In the Application Builder, double-click the Import button to open its settings window. Double-click Model > Component 1 > Geometry 1 > Import 1 > Source (type) and enter file as the argument. Use the Move Up button repeatedly to move it up to the top of the Command sequence. (The available arguments are: file, mesh, native, cad, and ecad.)
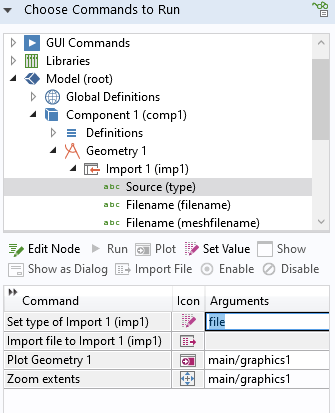
Enabling any file type for CAD import.
Tidying Up the App
In the list of downloadable files, you will find a slightly more sophisticated version of this app with the file name micromixer_app.mph. This version of the app is better organized, with all buttons available as ribbon items and the various inputs and outputs split into subforms in a Form Collection with sections for CAD, Mesh, Transport, Flow, and Results, as shown in the figure below. In addition, in the File menu, there are items for Save, Save As, Reset, and Report.
However, even in this version of the app, no programming is needed. It is created with a few more step only using the Form Editor. To keep the app simple, there are no error checks and no documentation. You will find more advanced apps in the COMSOL Multiphysics Application Libraries; for example, the Helical Static Mixer app.
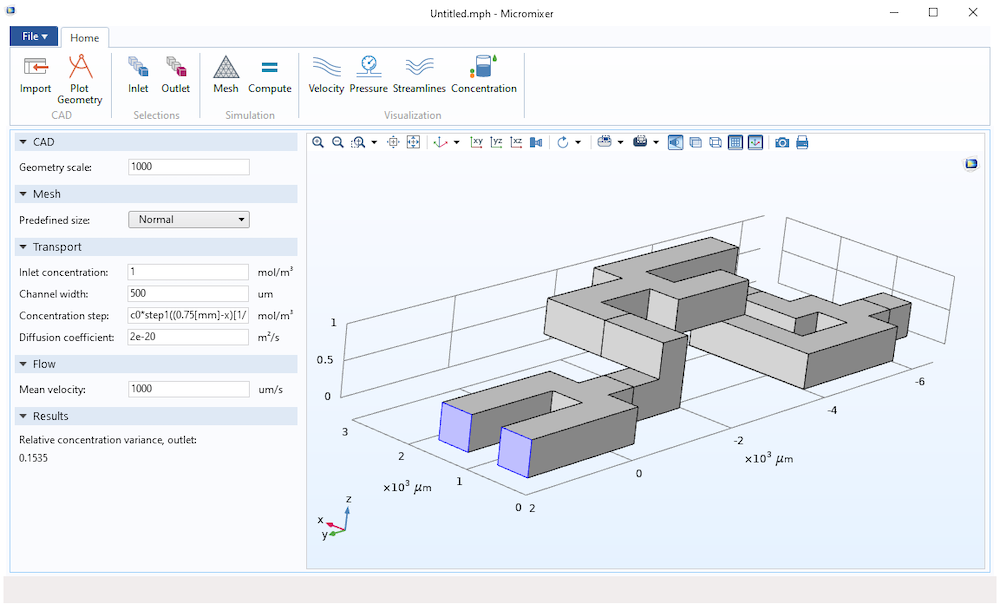
Inlet boundary conditions are being interactively applied to a micromixer geometry that was imported using the CAD import functionality in the app.
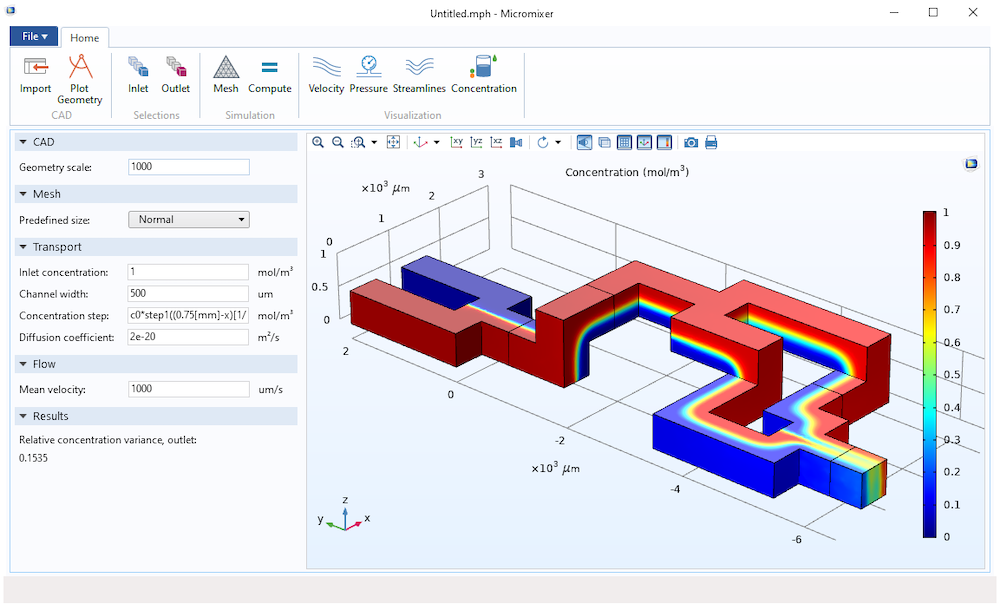
A better-designed version of the app, still created using only the Form Editor and no programming.
Using the App with COMSOL Server™ from a Web Browser
You can, of course, compile the app to a standalone application using COMSOL Compiler™, or alternatively run it by connecting to a COMSOL Server™ installation. When running with COMSOL Server, you have three choices on how to run an app:
- COMSOL Client for Windows®
- Standard web browser
- COMSOL Client for Android™
When running using COMSOL Client for Windows®, the way you perform selections by single-clicking in the user interface is identical to how you would do it with COMSOL Multiphysics®. When running using a standard web browser or the COMSOL Client for Android™, you instead double-click boundaries to select them.
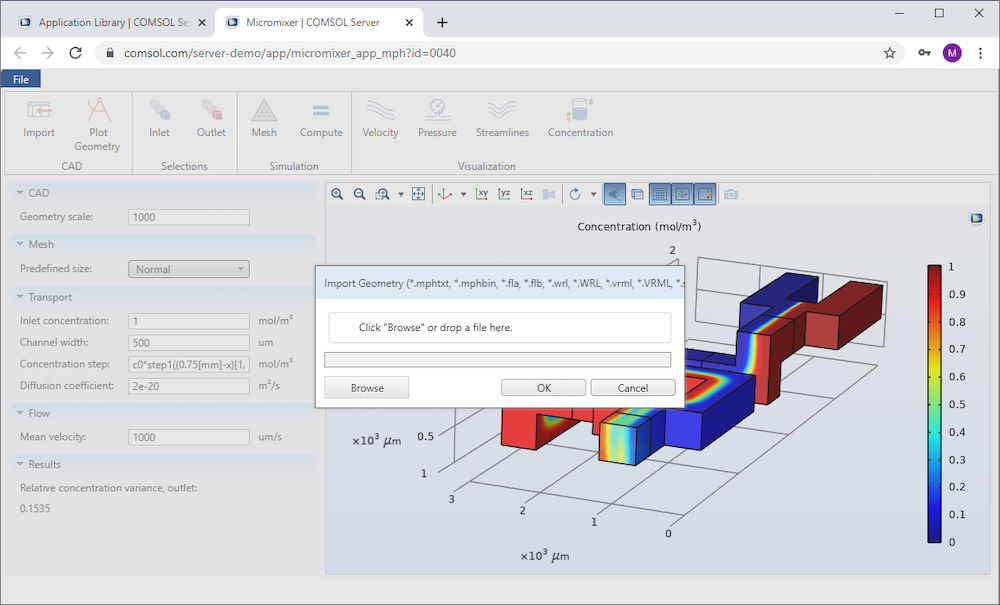
The app with CAD import and selection functionality running in the Chrome™ web browser by connecting to a COMSOL Server™ installation.
Potential Extensions to the App
This blog post showed how to create an app with CAD import and selections without any programming. The app has two types of boundary conditions for inlets and outlets, and it would be easy to extend the app with additional boundary conditions using the techniques presented here. For example, the app can have additional selections for other types of boundary conditions such as for setting a fixed pressure value or for modeling slip flow. This app illustrates CFD and transport; however, a similar app can easily be created for another physics area, such as structural mechanics, acoustics, electromagnetics, or heat transfer.
Download the App Files
Download the app discussed in this blog post by clicking the button below. Use the app as inspiration for building apps (and adding specialized functionalities!) of your own.
Android and Chrome are trademarks of Google LLC. Microsoft and Windows are either registered trademarks or trademarks of Microsoft Corporation in the United States and/or other countries.


Comments (2)
Rebeka Sultana
November 10, 2024Hello Bjorn,
Nice blog on incorporating CAD module into the application builder. I was trying something similar, however my goal is to translating the 3D CAD geometry to a user defined workplan. In geometry node I can usually do it by transferring the node/surface of a CAD object to a new location using explicit selection. However, while using the explicit selection in geometry node and contribute it to some cumulative selection, the selection can be only updated to other node such as -mesh, physics (boundary condition) settings. I tried to use the “explicit selection” of geometry node to incorporate it as user input in the application builder as you demonstrated the “explicit selection” of selection node/physics node to update by the user from application builder. However, this does not work that is the selection is unable the update in geometry node. I wonder is it because the “selection” works only for a build geometry (union/assembly)? Moreover, I would like to know is there any alternative way to translate/transform the 3D CAD geometry by a user given selection of point/edge/surface?
Thank you,
Rebeka
Bjorn Sjodin
November 15, 2024 COMSOL EmployeeHi Rebeka,
Thank you, you are correct. Selections for geometry objects cannot be made available in apps; only physics-related selections can be used. For geometry editing, one would need to use the full set of tools in the Model Builder.
Best regards,
Bjorn